Difference between revisions of "Collision Painting"
(→Configuration: Added description of colors, added some colors.) |
m (→How To Use: Corrected formatting on the arrow in the View step.) |
||
| (21 intermediate revisions by 3 users not shown) | |||
| Line 1: | Line 1: | ||
| − | The Collision Paint tool is used to | + | The Collision Paint tool is used to ''"label"'' objects or parts of objects to change how they interact with characters that collide with it. You can not paint collision on a level's terrain object. |
==How To Use== | ==How To Use== | ||
| + | The Collision Paint window can be accessed in Edit Mode by navigating in the menu bar to ''Windows'' -> ''Collision Paint''. | ||
[[File:Coll_Paint_Window.jpg|thumb|alt=Collision Paint window|Collision Paint window]] | [[File:Coll_Paint_Window.jpg|thumb|alt=Collision Paint window|Collision Paint window]] | ||
| − | |||
| − | * View the collision by checking ''View Collision'' | + | * View the collision by checking ''View -> Collision paint visualization'' |
* To paint whatever the cursor hovers over press B | * To paint whatever the cursor hovers over press B | ||
* To paint the whole object check ''Per-object'' | * To paint the whole object check ''Per-object'' | ||
| Line 12: | Line 12: | ||
** To paint the hovered triangle and adjacent triangles with the same orientation check ''Spread across flat surfaces'' | ** To paint the hovered triangle and adjacent triangles with the same orientation check ''Spread across flat surfaces'' | ||
** To spread to Triangles with similar orientation on the same object check ''Spread across similar normals'' | ** To spread to Triangles with similar orientation on the same object check ''Spread across similar normals'' | ||
| − | *** | + | *** The ''Range'' decides how similar the normals of each triangle need to be to spread, 1 spreads almost nothing, -1 spreads to everything |
| − | + | * The ''Load'' button loads any currently existing collision paint to Data/Levels/[mod-folder]. | |
| − | * | + | * The ''Save'' button saves the current collision paint to Data/Levels/[mod-folder]. |
| + | |||
| + | The collision painting for a level is saved next to the level's XML file with the file name ''*.col_norm.zip'' where the * is the name of the level's file. | ||
| + | |||
| + | '''Something to keep in mind is that ''*.col_norm.zip'' files are saved to your game's Data/Levels folder. You will have to move it into your Mod directory, otherwise the collision paint will not be included with your mod.''' | ||
| + | |||
| + | ==Labels== | ||
| + | [[File:Collision_paint.jpg|thumb|alt=Collision Paint window|Collision Paint color chart]] | ||
| + | |||
| + | The label checked in the lower box will be applied to the triangles by painting. The painted surfaces will indicate its parameter with a specific color when ''View Collision'' is checked. | ||
| + | Each label's color is written between parentheses below. | ||
| − | |||
| − | |||
| − | |||
===Floor=== | ===Floor=== | ||
| − | ''' | + | * '''Walkable:''' (Green) The surface is treated as if it is facing upward, so it's easier and faster to move around on, useful for stairs and for making bumpy areas easier to move around on. |
| − | * ''' | + | * '''Balance:''' (Light-Green) When painted on very thin surfaces the character's feet will stand better on the object. '''This is not functional; Using this type will cause issues.''' |
| − | + | * '''Slide:''' (Cyan) Makes characters slide off of the surface. If a character jumps while on this surface, they always jump straight upwards. If a character slides into the ground, there will be some audio issues. | |
| − | * '''Slide:''' () | ||
===Wall=== | ===Wall=== | ||
| − | + | * '''Wallrun:''' (Red) Allows wall running on those triangles if they're steep enough. | |
| − | * '''Wallrun:''' () Allows wall running on those triangles if they're steep enough. | + | * '''No wallrun:''' (Orange) Won't allow wall running and climbing on those triangles. |
| − | * '''No wallrun:''' () Won't allow wall running on those triangles. | + | * '''Ledge:''' (Pink) Forces the triangles to be treated as a ledge that can be grabbed, some constraints still apply, but this marking makes the system more lenient. |
| − | * '''Ledge:''' ( | + | * '''Ragdoll:''' (Blue) Character ragdolls if it touches the surface. |
| − | * '''Ragdoll:''' (Blue) Character | + | * '''Ragdoll-death:''' (Blue) Character dies if it touches the surface. |
| − | * '''Ragdoll-death:''' (Blue) Character | ||
===Ceiling=== | ===Ceiling=== | ||
| − | + | * '''Ceiling:''' (Blue) The surface is regarded as if it's facing downwards, so you can't land on it, and you will bounce down if you jump up into it. | |
| − | * '''Ceiling:''' ( | + | |
===Unlabled=== | ===Unlabled=== | ||
| − | + | * '''Clear:''' (No color) Resets to the default collision behavior which is based on the triangles normal. | |
| − | * '''Clear:''' (No color) | + | * '''No climb:''' (Grey) Has default collision behavior except that the edges can't be grabbed. |
| + | ** You can paint the 'no-climb' label to all unlabled triangles by clicking the ''Apply 'no climb' to all unlabled surfaces'' button | ||
| − | + | [[Category: Overgrowth]] | |
| − | + | [[Category: Modding]] | |
Latest revision as of 20:37, 12 July 2022
The Collision Paint tool is used to "label" objects or parts of objects to change how they interact with characters that collide with it. You can not paint collision on a level's terrain object.
How To Use
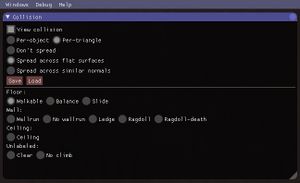
The Collision Paint window can be accessed in Edit Mode by navigating in the menu bar to Windows -> Collision Paint.
- View the collision by checking View -> Collision paint visualization
- To paint whatever the cursor hovers over press B
- To paint the whole object check Per-object
- To paint per-triangle check per-triangle
- To only paint the hovered triangle check Don't Spread
- To paint the hovered triangle and adjacent triangles with the same orientation check Spread across flat surfaces
- To spread to Triangles with similar orientation on the same object check Spread across similar normals
- The Range decides how similar the normals of each triangle need to be to spread, 1 spreads almost nothing, -1 spreads to everything
- The Load button loads any currently existing collision paint to Data/Levels/[mod-folder].
- The Save button saves the current collision paint to Data/Levels/[mod-folder].
The collision painting for a level is saved next to the level's XML file with the file name *.col_norm.zip where the * is the name of the level's file.
Something to keep in mind is that *.col_norm.zip files are saved to your game's Data/Levels folder. You will have to move it into your Mod directory, otherwise the collision paint will not be included with your mod.
Labels
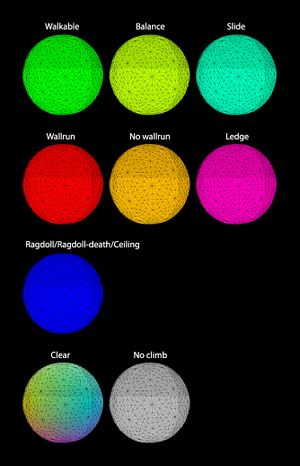
The label checked in the lower box will be applied to the triangles by painting. The painted surfaces will indicate its parameter with a specific color when View Collision is checked. Each label's color is written between parentheses below.
Floor
- Walkable: (Green) The surface is treated as if it is facing upward, so it's easier and faster to move around on, useful for stairs and for making bumpy areas easier to move around on.
- Balance: (Light-Green) When painted on very thin surfaces the character's feet will stand better on the object. This is not functional; Using this type will cause issues.
- Slide: (Cyan) Makes characters slide off of the surface. If a character jumps while on this surface, they always jump straight upwards. If a character slides into the ground, there will be some audio issues.
Wall
- Wallrun: (Red) Allows wall running on those triangles if they're steep enough.
- No wallrun: (Orange) Won't allow wall running and climbing on those triangles.
- Ledge: (Pink) Forces the triangles to be treated as a ledge that can be grabbed, some constraints still apply, but this marking makes the system more lenient.
- Ragdoll: (Blue) Character ragdolls if it touches the surface.
- Ragdoll-death: (Blue) Character dies if it touches the surface.
Ceiling
- Ceiling: (Blue) The surface is regarded as if it's facing downwards, so you can't land on it, and you will bounce down if you jump up into it.
Unlabled
- Clear: (No color) Resets to the default collision behavior which is based on the triangles normal.
- No climb: (Grey) Has default collision behavior except that the edges can't be grabbed.
- You can paint the 'no-climb' label to all unlabled triangles by clicking the Apply 'no climb' to all unlabled surfaces button

