Difference between revisions of "Lighting"
Silverfish (talk | contribs) (→Point lights) |
(→Gotchas) |
||
| (24 intermediate revisions by 3 users not shown) | |||
| Line 1: | Line 1: | ||
{{stub}} | {{stub}} | ||
| + | |||
| + | '''TODO''': Cover other level parameters, such as HDR points, saturation, and sky brightness. These parameters are covered in the [[Script Parameters]] page, so might want to take care to not duplicate too much of the information and maybe include a link to that page<br> | ||
| + | '''TODO''': Expand sun section to say how to get a "sun" and a "moon" effect | ||
== Sunlight == | == Sunlight == | ||
| − | The sun allows you to cast dynamic, single-directional light throughout a level. You can use it to simulate either a sun (more direct light) or a moon (more ambient light) | + | The sun allows you to cast dynamic, single-directional light throughout a level.<br> |
| + | You can use it to simulate either a sun (more direct light) or a moon (more ambient light) | ||
| + | |||
| + | <br clear=all> | ||
| + | [[Image:Sun_editor.jpg|left|thumb|The sun editor]] | ||
| + | {{#ev:youtube | ||
| + | |DUaBoNEUcVI | ||
| + | | | ||
| + | |right | ||
| + | |Editing the sun and sky | ||
| + | |frame | ||
| + | |start=267 | ||
| + | }} | ||
| + | |||
| + | <br clear=all> | ||
| + | === How to adjust the sun === | ||
| + | * Select the sun in the sky (double click it) | ||
| + | * Move it by clicking on the middle and dragging it around | ||
| + | * Change the color by dragging the dot around the outer ring | ||
| + | * Change the intensity by clicking ''just'' outside the outer ring and dragging it | ||
| + | |||
| + | To deselect the sun, double click well outside of the sun editor ('''Note''': the normal Q for "deselect all" isn't working right now) | ||
| + | |||
| + | === How to edit the parameters directly === | ||
| + | If you have problems clicking it, or would prefer a numeric editor: | ||
| + | * Press the <kbd>'''Y'''</kbd> key to open the Scenegraph | ||
| + | * Expand '''level''' to find the Sun parameters | ||
| + | |||
| + | <br clear=all> | ||
| + | |||
| + | == Reflection Capture == | ||
| + | |||
| + | Reflection capture objects are used for ambient lighting, reflections, and the color of the fog in each direction. | ||
| + | |||
| + | There are two kinds of reflection capture objects, ''Global Reflection'' and ''Local Reflection''. Both can be found under '''Load''' -> '''Lighting'''. A global reflection capture can be turned into a local one and vice versa by setting its ''Global'' script parameter to 1 or not. | ||
| + | |||
| + | === Gotchas === | ||
| + | Reflection captures are updated when moved, and each new result builds on the results of the previous reflection capture. This can be used to achieve some desired effect, but can also make it harder to get what you want sometimes. Try playing around with changing the brightness of the sky, amount of fog etc. to get different effects. | ||
| − | + | Certain [[Shader_And_Weather_Effects|level shaders]] will cause an issue where the sky will increase in brightness. To avoid this, disable the level shader temporarily. If the shader is important to include in the reflection capture, you can update it a single time by adjusting its position slightly within the Selected window. | |
| − | |||
| − | + | === Global reflection === | |
| − | + | Global reflection captures are used for the entire level, and each level should have exactly one. Since it affects the entire level it is often placed in a location that represents some sort of "average" lighting for the level. | |
| − | |||
| − | + | === Local reflection === | |
| + | Local reflection captures are used to change what the reflections look like in a specific region of the level. These are useful if there are caves or other types of areas where the ambient lighting changes significantly from the rest of the level. Move, rotate and scale the object to decide what part of the level should be affected. | ||
== Point lights == | == Point lights == | ||
Point lights allow you to cast omni-directional light from a point in the level. | Point lights allow you to cast omni-directional light from a point in the level. | ||
| + | {{#ev:youtube | ||
| + | |wOL0LJBRcas | ||
| + | | | ||
| + | |right | ||
| + | |Adding and editing point lights | ||
| + | |frame | ||
| + | |start=64 | ||
| + | }} | ||
| − | Top Bar -> Load -> Lighting -> Dynamic Light | + | === Adding a dynamic light: === |
| + | * '''Top Bar''' -> '''Load''' -> '''Lighting''' -> '''Dynamic Light''' | ||
| + | * The cursor will turn into a plus symbol | ||
| + | * Click in level to place the dynamic light | ||
| − | + | === Changing the size of a dynamic light === | |
| + | * Select the light - <code>'''double click'''</code> | ||
| + | * Hold <code>'''E'''</code> while clicking and dragging on its bounding box. | ||
| − | + | Note that this only changes the light's area of influence, not how much light it outputs.<br> | |
| − | If you need an "area light" | + | === Making a dynamic light brighter === |
| + | * Select the light - <code>'''double click'''</code> | ||
| + | * Open the color picker - <code>'''Ctrl + P'''</code> (<code>'''Command + P'''</code> on mac) | ||
| + | * Change the <code>'''Overbright'''</code> setting | ||
| + | |||
| + | === Adjusting dynamic light color: === | ||
| + | * Select the light | ||
| + | * Hit <code>'''CTRL + P'''</code> (<code>'''command + P'''</code> on mac) to open the '''Color Picker'''. | ||
| + | * Adjust the color with the color selector, or '''RGB''' at the bottom. | ||
| + | |||
| + | === Shaping the dynamic light === | ||
| + | Dynamic lights are always spherical right now. | ||
| + | If you need an "area light" effect that isn't a sphere, there are a few options: | ||
| + | * Use [[Lighting#Shadow_decals|Shadow Decals]] to shape the light (you have to enable this in the level first. See [[Lighting#Dynamic_lights_and_shadows|this section below]]) | ||
| + | * Place multiple dynamic light objects | ||
| + | * Some combination of both of the above | ||
| + | |||
| + | Be careful to both look at how the lights affect static objects in the scene, and how they affect characters that walk through them. | ||
| + | |||
| + | <br clear=all> | ||
== Shadow decals == | == Shadow decals == | ||
| − | Shadows from sunlight are taken care of automatically | + | Shadows from sunlight are taken care of automatically. |
| − | + | However this only allows one level of shadowing. This doesn't handle ambient occlusion (shadowing of indirect light reflections). | |
| − | Double click the ambient shadow decal, and hold E while clicking and dragging on its bounding box (or while shift + right-clicking and dragging on a side to only stretch in that direction). This will let you increase the spread of its effect. | + | Shadow [[Custom Decals|decals]] ("Ambient Shadows") allow you to manually place decals which simulate this ambient occlusion effect.<br> |
| + | This can help you visually anchor objects more realistically in the scene, and replicate effects like darkening around corners, and inside cubbyholes. | ||
| + | |||
| + | <br clear=all> | ||
| + | {{#ev:youtube | ||
| + | |wOL0LJBRcas | ||
| + | | | ||
| + | |right | ||
| + | |Adding and editing ambient shadows | ||
| + | |frame | ||
| + | |start=15 | ||
| + | }} | ||
| + | |||
| + | [[File:Ambient shadow decals.png|600px|Ambient Shadow Decals's effect on light]] | ||
| + | |||
| + | <br clear=all> | ||
| + | === Adding a shadow decal: === | ||
| + | |||
| + | * ''Top Bar -> Load -> Lighting -> Ambient Shadow''.<br> | ||
| + | * The cursor will turn into a plus symbol.<br> | ||
| + | * Now click in level to place the ambient shadow decal. | ||
| + | |||
| + | === Resizing a shadow decal: === | ||
| + | |||
| + | Double click the ambient shadow decal, and hold E while clicking and dragging on its bounding box (or while shift + right-clicking and dragging on a side to only stretch in that direction).<br> | ||
| + | This will let you increase the spread of its effect. | ||
'''Note''': Ambient shadow decals will not create shadows if they in direct light. This is because they're for simulating indirect shadowing. Direct shadowing is already handled by placing objects in the world. | '''Note''': Ambient shadow decals will not create shadows if they in direct light. This is because they're for simulating indirect shadowing. Direct shadowing is already handled by placing objects in the world. | ||
| − | + | <br clear=all> | |
| − | == | + | == Dynamic lights and shadows == |
| − | By default, no objects cast shadows from dynamic point lights. This is for performance reasons. | + | By default, no objects cast shadows from dynamic point lights (besides the sun). This is for performance reasons. |
Normally ambient shadow decals also will not create shadow from dynamic point lights, because that would be shading direct light, and they don't work that way. | Normally ambient shadow decals also will not create shadow from dynamic point lights, because that would be shading direct light, and they don't work that way. | ||
| Line 43: | Line 139: | ||
However you can use the <code>'''#SHADOW_POINT_LIGHTS'''</code> level Custom Shader to make it so shadow decals can shape point lights, so you can manually simulate this shadowing. | However you can use the <code>'''#SHADOW_POINT_LIGHTS'''</code> level Custom Shader to make it so shadow decals can shape point lights, so you can manually simulate this shadowing. | ||
| − | + | <br clear=all> | |
| − | |||
[[File:Shadow point lights shader disabled.png|400px|without #SHADOW_POINT_LIGHTS]] | [[File:Shadow point lights shader disabled.png|400px|without #SHADOW_POINT_LIGHTS]] | ||
[[File:Shadow_point_lights_shader.png|400px|#SHADOW_POINT_LIGHTS Custom Shader setting]] | [[File:Shadow_point_lights_shader.png|400px|#SHADOW_POINT_LIGHTS Custom Shader setting]] | ||
[[File:Shadow_point_lights_shader_enabled.png|400px|with #SHADOW_POINT_LIGHTS]] | [[File:Shadow_point_lights_shader_enabled.png|400px|with #SHADOW_POINT_LIGHTS]] | ||
| + | |||
| + | <br clear=all> | ||
| + | === Making shadow decals affect dynamic lights: === | ||
| + | |||
| + | * Hit <kbd>'''Y'''</kbd> to open the level's scenegraph | ||
| + | * Expand Script Params | ||
| + | * Add a <code>'''Custom Shader'''</code> param | ||
| + | * Hit <code>Enter</code> (not <code>tab</code>!) | ||
| + | * Type <code>'''#SHADOW_POINT_LIGHTS'''</code> in the value column and hit enter | ||
| + | |||
| + | This will make ambient shadows affect the direct light from dynamic lights, an let you sculpt the light they cast, or let you create manual shadows. | ||
| + | |||
| + | [[Category: Tutorials]] | ||
| + | [[Category: Modding]] | ||
| + | [[Category: Overgrowth]] | ||
Latest revision as of 21:24, 12 July 2022
This article is a stub. You should help Wolfire by expanding it.
TODO: Cover other level parameters, such as HDR points, saturation, and sky brightness. These parameters are covered in the Script Parameters page, so might want to take care to not duplicate too much of the information and maybe include a link to that page
TODO: Expand sun section to say how to get a "sun" and a "moon" effect
Contents
Sunlight
The sun allows you to cast dynamic, single-directional light throughout a level.
You can use it to simulate either a sun (more direct light) or a moon (more ambient light)
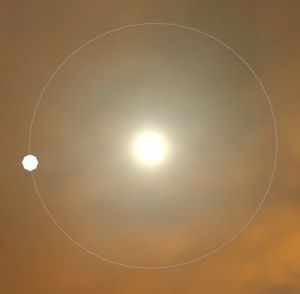
How to adjust the sun
- Select the sun in the sky (double click it)
- Move it by clicking on the middle and dragging it around
- Change the color by dragging the dot around the outer ring
- Change the intensity by clicking just outside the outer ring and dragging it
To deselect the sun, double click well outside of the sun editor (Note: the normal Q for "deselect all" isn't working right now)
How to edit the parameters directly
If you have problems clicking it, or would prefer a numeric editor:
- Press the Y key to open the Scenegraph
- Expand level to find the Sun parameters
Reflection Capture
Reflection capture objects are used for ambient lighting, reflections, and the color of the fog in each direction.
There are two kinds of reflection capture objects, Global Reflection and Local Reflection. Both can be found under Load -> Lighting. A global reflection capture can be turned into a local one and vice versa by setting its Global script parameter to 1 or not.
Gotchas
Reflection captures are updated when moved, and each new result builds on the results of the previous reflection capture. This can be used to achieve some desired effect, but can also make it harder to get what you want sometimes. Try playing around with changing the brightness of the sky, amount of fog etc. to get different effects.
Certain level shaders will cause an issue where the sky will increase in brightness. To avoid this, disable the level shader temporarily. If the shader is important to include in the reflection capture, you can update it a single time by adjusting its position slightly within the Selected window.
Global reflection
Global reflection captures are used for the entire level, and each level should have exactly one. Since it affects the entire level it is often placed in a location that represents some sort of "average" lighting for the level.
Local reflection
Local reflection captures are used to change what the reflections look like in a specific region of the level. These are useful if there are caves or other types of areas where the ambient lighting changes significantly from the rest of the level. Move, rotate and scale the object to decide what part of the level should be affected.
Point lights
Point lights allow you to cast omni-directional light from a point in the level.
Adding a dynamic light:
- Top Bar -> Load -> Lighting -> Dynamic Light
- The cursor will turn into a plus symbol
- Click in level to place the dynamic light
Changing the size of a dynamic light
- Select the light -
double click - Hold
Ewhile clicking and dragging on its bounding box.
Note that this only changes the light's area of influence, not how much light it outputs.
Making a dynamic light brighter
- Select the light -
double click - Open the color picker -
Ctrl + P(Command + Pon mac) - Change the
Overbrightsetting
Adjusting dynamic light color:
- Select the light
- Hit
CTRL + P(command + Pon mac) to open the Color Picker. - Adjust the color with the color selector, or RGB at the bottom.
Shaping the dynamic light
Dynamic lights are always spherical right now. If you need an "area light" effect that isn't a sphere, there are a few options:
- Use Shadow Decals to shape the light (you have to enable this in the level first. See this section below)
- Place multiple dynamic light objects
- Some combination of both of the above
Be careful to both look at how the lights affect static objects in the scene, and how they affect characters that walk through them.
Shadow decals
Shadows from sunlight are taken care of automatically.
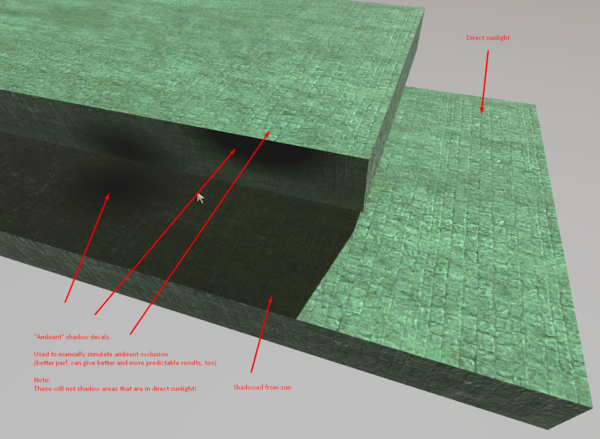
However this only allows one level of shadowing. This doesn't handle ambient occlusion (shadowing of indirect light reflections).
Shadow decals ("Ambient Shadows") allow you to manually place decals which simulate this ambient occlusion effect.
This can help you visually anchor objects more realistically in the scene, and replicate effects like darkening around corners, and inside cubbyholes.
Adding a shadow decal:
- Top Bar -> Load -> Lighting -> Ambient Shadow.
- The cursor will turn into a plus symbol.
- Now click in level to place the ambient shadow decal.
Resizing a shadow decal:
Double click the ambient shadow decal, and hold E while clicking and dragging on its bounding box (or while shift + right-clicking and dragging on a side to only stretch in that direction).
This will let you increase the spread of its effect.
Note: Ambient shadow decals will not create shadows if they in direct light. This is because they're for simulating indirect shadowing. Direct shadowing is already handled by placing objects in the world.
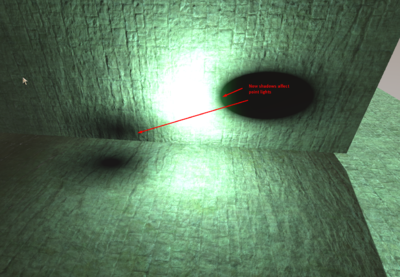
Dynamic lights and shadows
By default, no objects cast shadows from dynamic point lights (besides the sun). This is for performance reasons.
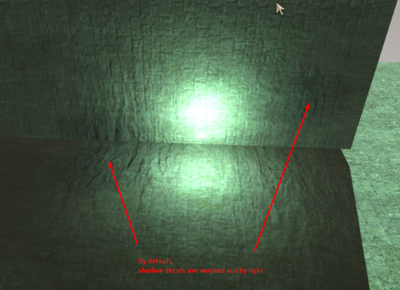
Normally ambient shadow decals also will not create shadow from dynamic point lights, because that would be shading direct light, and they don't work that way.
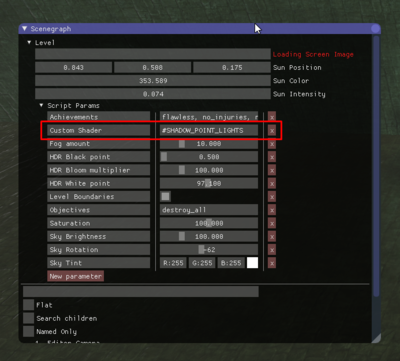
However you can use the #SHADOW_POINT_LIGHTS level Custom Shader to make it so shadow decals can shape point lights, so you can manually simulate this shadowing.
Making shadow decals affect dynamic lights:
- Hit Y to open the level's scenegraph
- Expand Script Params
- Add a
Custom Shaderparam - Hit
Enter(nottab!) - Type
#SHADOW_POINT_LIGHTSin the value column and hit enter
This will make ambient shadows affect the direct light from dynamic lights, an let you sculpt the light they cast, or let you create manual shadows.
