Difference between revisions of "NPC Navigation"
Silverfish (talk | contribs) (First version) |
Silverfish (talk | contribs) (Turned all h1 into h2 because h1 is used for the title of the article, and so should never be used in the body of the article) |
||
| (3 intermediate revisions by 3 users not shown) | |||
| Line 1: | Line 1: | ||
Overgrowth will automatically make sure that there is a navigation mesh for a level when you start it. However, this mesh might not be like you want it. For instance, maybe the NPCs can run up places they shouldn't, or they can't access some place of the level because they don't know where to jump since there are no jump nodes. This article goes through the tools you can use improve the way NPCs navigate through your levels. | Overgrowth will automatically make sure that there is a navigation mesh for a level when you start it. However, this mesh might not be like you want it. For instance, maybe the NPCs can run up places they shouldn't, or they can't access some place of the level because they don't know where to jump since there are no jump nodes. This article goes through the tools you can use improve the way NPCs navigate through your levels. | ||
| − | = Visualizing Navigation = | + | == Visualizing Navigation == |
[[Image:Nav_mesh_vis.jpg|right|thumb|caption|Nav mesh visualization]] | [[Image:Nav_mesh_vis.jpg|right|thumb|caption|Nav mesh visualization]] | ||
| Line 26: | Line 26: | ||
|} | |} | ||
| − | = Generating The Nav Mesh = | + | == Generating The Nav Mesh == |
In the editor, in the menu bar under ''Nav Mesh'' you have a button to create, save and load the nav mesh, as well as a number of parameters that decides how the nav mesh is generated. | In the editor, in the menu bar under ''Nav Mesh'' you have a button to create, save and load the nav mesh, as well as a number of parameters that decides how the nav mesh is generated. | ||
| + | |||
| + | In the ''Settings'' -> ''Debug'' menu is an option to ''Disable Auto Navmesh Regen'', which prevents the game from automatically generating nav meshes when levels are loaded. This is useful if a nav mesh is taking too long to generate. | ||
Overgrowth uses the Recast navigation mesh construction toolset to create it's nav meshes. The first step Recast takes when constructing the nav mesh is to create a voxel representation of the level geometry. It then uses that to figure out where a character should be able to walk. | Overgrowth uses the Recast navigation mesh construction toolset to create it's nav meshes. The first step Recast takes when constructing the nav mesh is to create a voxel representation of the level geometry. It then uses that to figure out where a character should be able to walk. | ||
| Line 62: | Line 64: | ||
|} | |} | ||
| − | = Nav Hints = | + | == Nav Hints == |
[[Image:nav_hint.jpg|right|thumb|caption|Left side: nav hint and the resulting nav mesh, right side: what the nav generator sees]] | [[Image:nav_hint.jpg|right|thumb|caption|Left side: nav hint and the resulting nav mesh, right side: what the nav generator sees]] | ||
| Line 75: | Line 77: | ||
If you want to see exactly what the nav generator sees, generate the nav mesh and then activate ''View → Collision''. This shows the collision the nav generator used the last time it generated the nav mesh. | If you want to see exactly what the nav generator sees, generate the nav mesh and then activate ''View → Collision''. This shows the collision the nav generator used the last time it generated the nav mesh. | ||
| − | = Nav Regions = | + | == Nav Regions == |
[[Image:nav_region.jpg|right|thumb|caption|The nav region limits the nav mesh area, improving the nav mesh generation times significantly]] | [[Image:nav_region.jpg|right|thumb|caption|The nav region limits the nav mesh area, improving the nav mesh generation times significantly]] | ||
| Line 86: | Line 88: | ||
A level can only have one nav region, any extra nav regions are ignored. | A level can only have one nav region, any extra nav regions are ignored. | ||
| − | = Jump Nodes = | + | == Jump Nodes == |
[[Image:jump_nodes.jpg|right|thumb|caption|Some connected jump nodes]] | [[Image:jump_nodes.jpg|right|thumb|caption|Some connected jump nodes]] | ||
| Line 99: | Line 101: | ||
There are some cases when jump nodes do not need to work both ways. For instance, if an NPC is spawned outside of the playable area, quite far up, where it will never have any possible reason to return, it could make sense to have a jump connection that only works in one direction. This is because then the NPC will never get stuck on the bottom jump node, because there will never be a case where the NPC would need to use it. | There are some cases when jump nodes do not need to work both ways. For instance, if an NPC is spawned outside of the playable area, quite far up, where it will never have any possible reason to return, it could make sense to have a jump connection that only works in one direction. This is because then the NPC will never get stuck on the bottom jump node, because there will never be a case where the NPC would need to use it. | ||
| − | = Testing Navigation = | + | == Testing Navigation == |
[[Image:nav_testing.jpg|right|thumb|caption|AI path and jump visualization]] | [[Image:nav_testing.jpg|right|thumb|caption|AI path and jump visualization]] | ||
| Line 113: | Line 115: | ||
Keeping the ''AI Mouse Path Testing'' setting activated can degrade performance in the editor quite a bit, so make sure to turn it off after you're done testing your nav mesh. | Keeping the ''AI Mouse Path Testing'' setting activated can degrade performance in the editor quite a bit, so make sure to turn it off after you're done testing your nav mesh. | ||
| + | |||
| + | [[Category: Modding]] | ||
| + | [[Category: Overgrowth]] | ||
Latest revision as of 09:42, 7 May 2018
Overgrowth will automatically make sure that there is a navigation mesh for a level when you start it. However, this mesh might not be like you want it. For instance, maybe the NPCs can run up places they shouldn't, or they can't access some place of the level because they don't know where to jump since there are no jump nodes. This article goes through the tools you can use improve the way NPCs navigate through your levels.
Contents
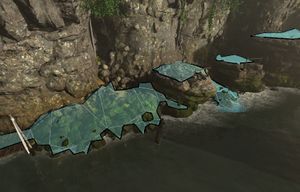
There are a number of useful visualizations you can use to see what's going on with the nav mesh and jump nodes. These are all available in the top menu bar under View.
| Option | Description |
|---|---|
| Nav mesh | The areas that are considered walkable |
| Collision | What geometry the nav mesh generator took into consideration when the current nav mesh was generated |
| Nav hints | Display nav hints |
| Nav regions | Display nav regions |
| Jump nodes | Display jump nodes |
In the editor, in the menu bar under Nav Mesh you have a button to create, save and load the nav mesh, as well as a number of parameters that decides how the nav mesh is generated.
In the Settings -> Debug menu is an option to Disable Auto Navmesh Regen, which prevents the game from automatically generating nav meshes when levels are loaded. This is useful if a nav mesh is taking too long to generate.
Overgrowth uses the Recast navigation mesh construction toolset to create it's nav meshes. The first step Recast takes when constructing the nav mesh is to create a voxel representation of the level geometry. It then uses that to figure out where a character should be able to walk.
All distance values in the nav mesh parameters refer to meters.
| Nav Mesh Parameter | Description | Default value |
|---|---|---|
| Cell Size | The width and depth of each voxel in the voxel step, a smaller number results in a more detailed and accurate nav mesh, but also increases generation time | 0.30 |
| Cell Height | The height of each voxel in the voxel step, a smaller number results in a more detailed and accurate nav mesh, but also increases generation time | 0.20 |
| Agent Height | How much ceiling height the characters in the game need | 1.70 |
| Agent Radius | How wide the characters in the game are, this value higher than the characters in the game actually are (they are not actually 0.8m wide), because movement in OG has so much momentum that there needs to be some extra margin to ensure characters can navigate well | 0.40 |
| Agent Max Climb | The tallest "stair" characters should be able to walk up, this is quite high by default to ensure the AI can get around easily by default, but once you start working on the nav mesh and jump nodes you can turn this down to around 0.70 and just make sure you handle all navigation issues that arise | 1.50 |
| Agent Max Slope | The steepest angle that should be considered walkable | 60.00 |
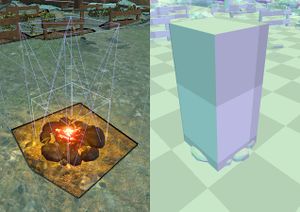
Sometimes you want to stop the nav generator from creating a walkable area somewhere, like if you don't want your NPCs to think they can walk under water. Other times the nav generator doesn't create a walkable area somewhere where NPCs should clearly be able to walk, maybe because there is some complicated geometry there. These types of issues can be solved using nav hints.
Nav hints are blocks that are only seen by the nav generator. So in the game they are invisible and passable, they ONLY matter when the nav mesh is generated.
Create a nav hint by going to Load → Utility → nav hint in the top menu bar. Once you click to place it you'll see a purple wireframe box that you can translate, rotate and scale. When the nav mesh is being generated it will regard this wirefram box as a solid block, so use it to block off or bridge over problematic areas.
Note that as with any box, navigation will still be generated inside the box, since Recast only considers the walls of any object solid.
If you want to see exactly what the nav generator sees, generate the nav mesh and then activate View → Collision. This shows the collision the nav generator used the last time it generated the nav mesh.
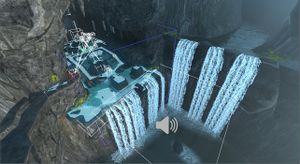
If you have a really big level, you might not want to generate navigation for all of it. Maybe the outer parts are an inaccessible backdrop or won't ever have any NPCs in it. This is where using a nav region is useful.
Once a nav region is placed, the nav mesh will only be generated inside that region. This can cut down on nav generation times a lot, and so can also be used to temporarliy get quicker nav generation times while working on a specific part of a level. Keep in mind though that moving the nav region can slightly change how the mesh is generated.
To create a nav region, go to Load → Utility → nav region in the top menu bar. It looks like a purple box, and can only be scaled and translated, not rotated. Simply scale and position the box so that all of the area you want to have nav mesh is covered.
A level can only have one nav region, any extra nav regions are ignored.
Jump Nodes
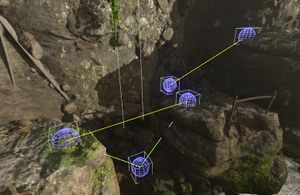
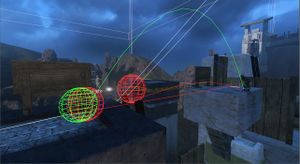
To tell NPCs to where they can jump you need to place jump nodes and connect them to each other.
To create a jump connection, create a jump node via Load → Utility → nav connection in the top menu bar. Once you have two jump nodes, slect one of them and hold alt while left clicking on the other to connect them to each other. When you generate the nav mesh the next time, these nodes will be positions that NPCs can jump to and from.
One jump node can have more than one connection.
Keep in mind that almost all jump nodes need to work both ways. If you make a really tall jump connection for instance, NPCs will be able to jump down, but since it's so tall, they will not be able to jump up. Since the connection is there, they will still try to jump up if it would be the fastest route. However, when they realize they can't jump that high, they will just stand on the jump node instead of trying to find anoter way. This is why you need to manually test your jump nodes to make sure they actually work both ways.
There are some cases when jump nodes do not need to work both ways. For instance, if an NPC is spawned outside of the playable area, quite far up, where it will never have any possible reason to return, it could make sense to have a jump connection that only works in one direction. This is because then the NPC will never get stuck on the bottom jump node, because there will never be a case where the NPC would need to use it.
To ensure that your jump nodes and nav mesh works as you expect you'll want to test it using debug tools.
To test navigation, in the top menu bar, press Settings → Debug → AI and activate Show AI Path to see where NPCs are going, Show AI Jump to see a visualization of where they are trying to jump, and AI Mouse Path Testing to be able to tell AI where to go.
Once you've activated the debug settings, select a character spawn point, point with the cursor where you want the character to go and press G.
This allows you to easily test if your navigation is working as expected. This is an especially useful method to test jump connections with.
You might want to deactivate the AI when doing this by pressing C. Otherwise the character you are testing with might get killed by some enemies in the level.
Keeping the AI Mouse Path Testing setting activated can degrade performance in the editor quite a bit, so make sure to turn it off after you're done testing your nav mesh.
