Custom Animations: Difference between revisions
m →Bone layers: Added bone layer image note |
|||
| (15 intermediate revisions by one other user not shown) | |||
| Line 4: | Line 4: | ||
A repackaged version of '''Blender 2.55''' for Windows with the export addon and with the UI set up for this task can be downloaded [https://cdn.wolfire.com/techsupport/Blender-Overgrowth-Win.zip here]. [https://youtu.be/CuFKEvTyYRw You can find a tutorial on how to animate in this version here.] | A repackaged version of '''Blender 2.55''' for Windows with the export addon and with the UI set up for this task can be downloaded [https://cdn.wolfire.com/techsupport/Blender-Overgrowth-Win.zip here]. [https://youtu.be/CuFKEvTyYRw You can find a tutorial on how to animate in this version here.] | ||
The scripts needed for using '''Blender | The scripts needed for using '''Blender 2.93''' and above are located at [https://github.com/WolfireGames/overgrowth/tree/main/Data/BlenderScript/2.93 Overgrowth's Github repository, here.] Download bone_io.zip and io_anm.rar and follow the Readme instructions. You can also check videos.rar for tutorial videos on how to install these scripts, if you need. | ||
These same scripts can also be found in the Overgrowth Modding channel on the Wolfire Discord, under the pinned messages. | |||
The best rig for making animations is rabbit_rig.blend -- This wiki page will assume you are using its default interface. '''TODO: How to switch to different species models?''' | The best rig for making animations is rabbit_rig.blend -- This wiki page will assume you are using its default interface. '''TODO: How to switch to different species models?''' | ||
'''NOTE: Blender 4.0+ is NOT compatible with the 2.93 scripts!''' You will get an error while exporting .anm files. | |||
== Creating an animation == | == Creating an animation == | ||
| Line 30: | Line 33: | ||
===Changing the start & end frames=== | ===Changing the start & end frames=== | ||
[[File:Rig_params.gif|thumb| | [[File:Rig_params.gif|thumb|239px|right|How to find the animation controls for exported frame data (Click to animate!)]] | ||
[[File:Start_end_frames.png|thumb|340px|right|How to set the animation duration]] | |||
How long your animation lasts depends on the values specified in Blender's Timeline window. In its top right, you can find the Start and End values. While the Use Preview Range button is toggled, the From Timeline button in the rig parameters will affect your exported animation's frame data. | How long your animation lasts depends on the values specified in Blender's Timeline window. In its top right, you can find the Start and End values. | ||
While the Use Preview Range button is toggled, the From Timeline button in the rig parameters will affect your exported animation's frame data. | |||
If your animation duration is too short or too long, your animation might last too long, or it might get cut off. | |||
===Exporting an animation=== | ===Exporting an animation=== | ||
| Line 43: | Line 50: | ||
=== Bone layers === | === Bone layers === | ||
[[File:Animation_rig_layers.png|thumb| | [[File:Animation_rig_layers.png|thumb|439px|right|Cyan text is only for character rigging. White text is only for animation. Green text is only for DEF bones, which are used for special keyframes.]] | ||
Sets of bones within the animation rig are hidden underneath several different layers. Each layer contains different bones; By hiding and unhiding specific layers, you can fine tune your available bones as pictured right. | Sets of bones within the animation rig are hidden underneath several different layers. Each layer contains different bones; By hiding and unhiding specific layers, you can fine tune your available bones as pictured right. | ||
| Line 61: | Line 68: | ||
==Event Keyframes== | ==Event Keyframes== | ||
Event keyframes are used to tell the game at which moment of an animation an event is going to happen. This is used to trigger attack impacts and footstep sounds among other things. | Event keyframes are used to tell the game at which moment of an animation an event is going to happen. This is used to trigger attack impacts and footstep sounds among other things. | ||
An event is saved as a ''Custom Property'' of a bone in the Blender files shipped with the game. Access these custom properties by clicking on the Bone Properties tab within the Properties window. | An event is saved as a ''Custom Property'' of a bone in the Blender files shipped with the game. Access these custom properties by clicking on the '''Bone Properties''' tab within the Properties window. | ||
All event keyframes work regardless of what value you assign to them (0.0, 1.0, inbetween); What matters is their placement. | |||
Some other keyframes require a range from 0.0 to 1.0 to work properly. These are noted in this table when applicable. | |||
{| class="wikitable" | {| class="wikitable" | ||
|- | |- | ||
! Event Name !! Description | ! Event Name !! Description | ||
|- | |- | ||
|event_attackimpact || | |event_attackimpact || Triggers the actual impact while attacking a character. Works on any DEF bone | ||
|- | |- | ||
|event_blockprepare || | |event_blockprepare || Specifies the latest time at which the attack is still blockable, which is also the latest time that it can be canceled as a “feint” by pressing right-click | ||
|- | |- | ||
|event_attackblocked|| | |event_attackblocked|| Dictates when an attack is blocked in a blocked attack | ||
|- | |- | ||
|event_rightcrouchwalkstep|| | |event_rightcrouchwalkstep||Triggers footstep sounds for sneaking, emits AI sound and creates particles while on terrain | ||
|- | |- | ||
|event_rightrunstep|| | |event_rightrunstep||Triggers footstep sounds for running, emits AI sound and creates particles while on terrain | ||
|- | |- | ||
|event_rightwalkstep|| | |event_rightwalkstep||Triggers footstep sounds for walking, emits AI sound and creates particles while on terrain | ||
|- | |- | ||
|event_rightwallstep|| | |event_rightwallstep||Triggers footstep sounds for wall running and emits AI sound | ||
|- | |- | ||
|event_golimp||Causes the character to ragdoll into | |event_golimp||Causes the character to ragdoll into an active ragdoll state. Used in throw attacks | ||
|- | |- | ||
|event_grabitem|| | |event_grabitem|| Grabs the nearest pickupable item within 90cm of the hand | ||
|- | |- | ||
|event_heldweaponswap||Causes the character to switch the currently held item's handedness | |event_heldweaponswap||Causes the character to switch the currently held item's handedness | ||
|- | |- | ||
|event_rightweaponrelease||Causes the character to let go of the right hand's currently held item | |event_rightweaponrelease||Causes the character to let go of the right hand's currently held item | ||
|- | |||
|event_leftweaponrelease||As above, but for the left hand. Is not included in the animation rig by default; Has to be added | |||
|- | |- | ||
|event_sheatherighthandlefthip||Sheathes the right hand's item to the left hip | |event_sheatherighthandlefthip||Sheathes the right hand's item to the left hip | ||
| Line 92: | Line 104: | ||
|event_sheatherighthandrighthip||Sheathes the right hand's item to the right hip | |event_sheatherighthandrighthip||Sheathes the right hand's item to the right hip | ||
|- | |- | ||
|event_throatcut|| | |event_throatcut|| Slits opponent's throat. Only works with "tethered" characters, like when choking | ||
|- | |- | ||
|event_unsheatherighthandlefthip||Unsheathes the left hip's item into the right hand | |event_unsheatherighthandlefthip||Unsheathes the left hip's item into the right hand | ||
|- | |- | ||
|event_unsheatherighthandrighthi||Unsheathes the right hip's item into the right hand | |event_unsheatherighthandrighthi||Unsheathes the right hip's item into the right hand | ||
|- | |||
|weap_to_hand_l||Switches weapon to left hand. | |||
|- | |||
|weap_to_hand_r||Switches weapon to right hand. | |||
|- | |||
|ik||Switches from FK (0.0) to IK (1.0). Mostly affects animation interpolation | |||
|- | |||
|shape_fist||Ranges from fist closed (0.0) to wide open (1.0). | |||
|- | |||
|status_cancel||Specifies when the remainder of the animation can be skipped when the player tries to move. Used for "optional" ending bits of attacks. '''TODO: Is this from a 0.0 to 1.0 range?''' | |||
|- | |||
|status_escape||Ranges from 0 to 1. When this is 1, the thrown character can escape from the throw | |||
|- | |||
|status_groundconform||TODO: Might be related to the rolling animation when on slopes. How does this work? | |||
|- | |||
|status_rightarm_blend||Controls how closely the right arm follows the animation. Ranges from 0.0 (default, "floppy") to 1.0 (stiff and exact). | |||
|- | |||
|status_leftarm_blend||^^^, but for the left arm. | |||
|} | |} | ||
If you find properties not listed here, they are most likely used for character rigging or Blender animation (not read by the game). | |||
===Adding an | ===Adding an Event Keyframe to your animation=== | ||
# | # Make sure DEF bones are revealed (see Bone layers) | ||
# Select the appropriate bone for the event you want to trigger while being in pose mode | # Select the appropriate DEF bone for the event you want to trigger while being in pose mode | ||
# Set the playhead in the timeline to the moment you want the event to happen | # Set the playhead in the timeline to the moment you want the event to happen | ||
# In the '''Properties''' editor, press '''Bone''' and scroll down to '''Custom Properties''' | # In the '''Properties''' editor, press '''Bone''' and scroll down to '''Custom Properties''' | ||
# Hover over the property that corresponds to the event you want to trigger and press '''I''' to add a keyframe. (Value doesn't matter) | # Hover over the property that corresponds to the event you want to trigger and press '''I''' to add a keyframe. (Value doesn't matter) | ||
To ungroup a keyframe, select it (so | To ungroup a keyframe in the dopesheet from its parent, select it from the parent's dropdown menu (so the event keyframe's name lights up) and press CTRL + ALT + G. Now the keyframe should be sent to the bottom, for easier editing! | ||
===Bone Influence=== | |||
Certain animations have Influence keyframes. Usually, it's something like "Influence (DEF-toe.L : left_leg)". These are to make sure the bone stays on the ground while the animation plays. '''TODO: How else can Influence be used?''' | |||
To add Influence keyframes like this, select the desired bone (usually DEF-toe) and look at the Bone Constraints menu in your Properties. Find the desired bone constraint, right click the value field and click Insert Keyframe. | |||
==Control Bone Contraints== | |||
If you have your hinge contraints set to 0, in you control-bone properties, your in-game dialogue torso and head controls will work correctly. | |||
Setting the value to 1, tightens the hinge all the way. | |||
[[File:hinge_keys.jpg]] | |||
{| class="wikitable" | |||
|hinge (torso)||controls the tightness of the in-game torso widget for dialogue. | |||
|- | |||
|hinge (head)||controls the tightness of the in-game head widget for dialogue. | |||
|- | |||
|hinge (neck)||no neck widget, so helps with head movement? | |||
|- | |||
|hinge (upper_arm.R)||Unsure. | |||
|- | |||
|hinge (upper_arm.L)||Unsure. | |||
|- | |||
|} | |||
==Animating Morph Targets== | ==Animating Morph Targets== | ||
Latest revision as of 14:45, 24 October 2024
Overview
Animations for rigged objects in Overgrowth are stored with one of the Phoenix Engine's custom binary file formats, namely the PHXANM (Phoenix Animation) format. To export an animation to a PHXANM (File mask: .anm) file you need to use Wolfire's custom export addon for Blender.
A repackaged version of Blender 2.55 for Windows with the export addon and with the UI set up for this task can be downloaded here. You can find a tutorial on how to animate in this version here.
The scripts needed for using Blender 2.93 and above are located at Overgrowth's Github repository, here. Download bone_io.zip and io_anm.rar and follow the Readme instructions. You can also check videos.rar for tutorial videos on how to install these scripts, if you need. These same scripts can also be found in the Overgrowth Modding channel on the Wolfire Discord, under the pinned messages.
The best rig for making animations is rabbit_rig.blend -- This wiki page will assume you are using its default interface. TODO: How to switch to different species models?
NOTE: Blender 4.0+ is NOT compatible with the 2.93 scripts! You will get an error while exporting .anm files.
Creating an animation
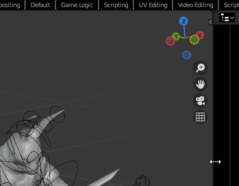
On the left hand side of your Blender character rig, you'll see a Dopesheet. If it's too small, you can drag it out and expand the border to see the full toolbar. This dopesheet contains a timeline of every keyframe defined for the animation.
In order to pose a character and make new keyframes, you must first select Pose Mode in the 3D Viewport's toolbar (located by default on its bottom). Then, you can select a bone and change it around. I recommend enabling Object Gizmos in the 3D Viewport's toolbar. Here's a quick reference for Blender 3.4's default interface controls:
- Left click to Select
- Right click to Manipulate
- Scroll wheel click to Orbit camera
- G to Translate selected (or rotate fixed bones)
- R to Rotate selected
- ESC to Cancel current change
Each keyframe contains data for a bone. Its position on the dopesheet dictates when the bone will conform to the pose. If you set the dopesheet's timeline over a keyframe, your changes to the bone will overwrite the current keyframe's data. You can change this behavior by checking the Record button's options on the timeline at the very bottom.
Selecting different poses

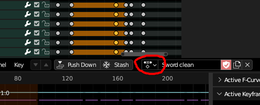
Click the button pictured on the Dopesheet's toolbar to browse and select the poses included in the character rig. Any rig has a maximum pose limit, which when reached will start recycling old poses. Todo: How large is this limit?
You can make a new pose by clicking the New Action button next to the pose name. Make sure not to overwrite any useful poses you may have in the rig!
Changing the start & end frames


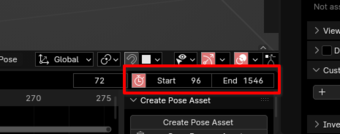
How long your animation lasts depends on the values specified in Blender's Timeline window. In its top right, you can find the Start and End values. While the Use Preview Range button is toggled, the From Timeline button in the rig parameters will affect your exported animation's frame data.
If your animation duration is too short or too long, your animation might last too long, or it might get cut off.
Exporting an animation
- Create your custom animation in Blender
- Set the metadata for your animation in the sidebar of the 3D Viewport, as pictured below
- Click the From Timeline button to set the timeline's start & end frames as the start & end points of your animation; Note: Keyframes outside of this time frame won't be exported.
- Set the Looping value to 0 if you don't want your animation to loop. Set it to 1 if you want it to loop. Todo: If the value is higher, will it do sth different, like play the animation n times?
- With the skeleton selected, press File > Export > Phoenix Animation (.anm) Note: Make sure not to have any IK bones selected while in Pose Mode, or else the script may crash!
Bone layers

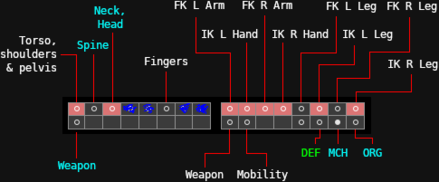
Sets of bones within the animation rig are hidden underneath several different layers. Each layer contains different bones; By hiding and unhiding specific layers, you can fine tune your available bones as pictured right.
FK stands for Fixed Kinematics, where each limb's position is manually set and is best used for dynamic animations with lots of movement (like attacks).
IK stands for Inverse Kinematics, where paws are placed and limbs follow.
To switch between the two modes of animation, you must set the IK property keyframe to 0 (for FK) or 1 (for IK). You can only set this property keyframe on IK bones.
In order to add event keyframes, you must first select a DEF bone. In the animation rigs that are shipped with the game, these bones are hidden. In order to unhide them, you must first:
- Enter Pose Mode in the 3D Viewport
- Press A to select everything
- Press ALT + H to reveal everything, including the DEF bones
After revealing everything, you might find the rig is a bit cluttered with unnecessary bones, like ORG and MCH bones. These are only used for rigging, and not for animation. Select these and press H to hide them individually.
Event Keyframes
Event keyframes are used to tell the game at which moment of an animation an event is going to happen. This is used to trigger attack impacts and footstep sounds among other things. An event is saved as a Custom Property of a bone in the Blender files shipped with the game. Access these custom properties by clicking on the Bone Properties tab within the Properties window.
All event keyframes work regardless of what value you assign to them (0.0, 1.0, inbetween); What matters is their placement. Some other keyframes require a range from 0.0 to 1.0 to work properly. These are noted in this table when applicable.
| Event Name | Description |
|---|---|
| event_attackimpact | Triggers the actual impact while attacking a character. Works on any DEF bone |
| event_blockprepare | Specifies the latest time at which the attack is still blockable, which is also the latest time that it can be canceled as a “feint” by pressing right-click |
| event_attackblocked | Dictates when an attack is blocked in a blocked attack |
| event_rightcrouchwalkstep | Triggers footstep sounds for sneaking, emits AI sound and creates particles while on terrain |
| event_rightrunstep | Triggers footstep sounds for running, emits AI sound and creates particles while on terrain |
| event_rightwalkstep | Triggers footstep sounds for walking, emits AI sound and creates particles while on terrain |
| event_rightwallstep | Triggers footstep sounds for wall running and emits AI sound |
| event_golimp | Causes the character to ragdoll into an active ragdoll state. Used in throw attacks |
| event_grabitem | Grabs the nearest pickupable item within 90cm of the hand |
| event_heldweaponswap | Causes the character to switch the currently held item's handedness |
| event_rightweaponrelease | Causes the character to let go of the right hand's currently held item |
| event_leftweaponrelease | As above, but for the left hand. Is not included in the animation rig by default; Has to be added |
| event_sheatherighthandlefthip | Sheathes the right hand's item to the left hip |
| event_sheatherighthandrighthip | Sheathes the right hand's item to the right hip |
| event_throatcut | Slits opponent's throat. Only works with "tethered" characters, like when choking |
| event_unsheatherighthandlefthip | Unsheathes the left hip's item into the right hand |
| event_unsheatherighthandrighthi | Unsheathes the right hip's item into the right hand |
| weap_to_hand_l | Switches weapon to left hand. |
| weap_to_hand_r | Switches weapon to right hand. |
| ik | Switches from FK (0.0) to IK (1.0). Mostly affects animation interpolation |
| shape_fist | Ranges from fist closed (0.0) to wide open (1.0). |
| status_cancel | Specifies when the remainder of the animation can be skipped when the player tries to move. Used for "optional" ending bits of attacks. TODO: Is this from a 0.0 to 1.0 range? |
| status_escape | Ranges from 0 to 1. When this is 1, the thrown character can escape from the throw |
| status_groundconform | TODO: Might be related to the rolling animation when on slopes. How does this work? |
| status_rightarm_blend | Controls how closely the right arm follows the animation. Ranges from 0.0 (default, "floppy") to 1.0 (stiff and exact). |
| status_leftarm_blend | ^^^, but for the left arm. |
If you find properties not listed here, they are most likely used for character rigging or Blender animation (not read by the game).
Adding an Event Keyframe to your animation
- Make sure DEF bones are revealed (see Bone layers)
- Select the appropriate DEF bone for the event you want to trigger while being in pose mode
- Set the playhead in the timeline to the moment you want the event to happen
- In the Properties editor, press Bone and scroll down to Custom Properties
- Hover over the property that corresponds to the event you want to trigger and press I to add a keyframe. (Value doesn't matter)
To ungroup a keyframe in the dopesheet from its parent, select it from the parent's dropdown menu (so the event keyframe's name lights up) and press CTRL + ALT + G. Now the keyframe should be sent to the bottom, for easier editing!
Bone Influence
Certain animations have Influence keyframes. Usually, it's something like "Influence (DEF-toe.L : left_leg)". These are to make sure the bone stays on the ground while the animation plays. TODO: How else can Influence be used?
To add Influence keyframes like this, select the desired bone (usually DEF-toe) and look at the Bone Constraints menu in your Properties. Find the desired bone constraint, right click the value field and click Insert Keyframe.
Control Bone Contraints
If you have your hinge contraints set to 0, in you control-bone properties, your in-game dialogue torso and head controls will work correctly.
Setting the value to 1, tightens the hinge all the way.

| hinge (torso) | controls the tightness of the in-game torso widget for dialogue. |
| hinge (head) | controls the tightness of the in-game head widget for dialogue. |
| hinge (neck) | no neck widget, so helps with head movement? |
| hinge (upper_arm.R) | Unsure. |
| hinge (upper_arm.L) | Unsure. |
Animating Morph Targets
Todo: Add this section