Difference between revisions of "Editor Interface"
Silverfish (talk | contribs) (→Scale: Can no longer select transformation tools, so edited for that) |
Silverfish (talk | contribs) (→Rotation: Can no longer select transformation tools, so edited for that) |
||
| Line 133: | Line 133: | ||
=== Rotation === | === Rotation === | ||
| − | + | Hover mouse near bounding box edges but away from the corners, or hold 'r'. | |
{| class="wikitable" | {| class="wikitable" | ||
Revision as of 17:29, 8 November 2017
Contents
- 1 Introduction
- 2 Camera Movement
- 3 Object Selection
- 4 Transformations
- 5 Debug Window
- 6 Editor menu
- 7 Functions Without Buttons
- 8 Selected Window (object parameters editor)
- 9 Scenegraph Window (level parameters editor)
- 10 Color Picker
- 11 Save Selected Objects
- 12 Sun Editor
- 13 Dialogue Editor
- 14 Spawn Corpse
Introduction
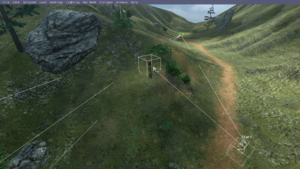
This page details all the interface elements and actions in the Overgrowth level editor.
It can be accessed by creating a new level (File -> New), or by pressing the F1 button while in an existing level.
If the editor is already active inside a level, you can open up the editor window again by hitting Escape.
You can deactivate the editor by hitting F1 a second time.
Note that while the editor is active, no story mode progress will be saved, and no story levels can be unlocked.
Camera Movement
| Action | Control | Behavior |
|---|---|---|
| Forward | W | Moves camera forward. |
| Backward | S | Moves camera backward. |
| Left | A | Moves camera left. |
| Right | D | Moves camera right. |
| Up | Shift + W | Moves camera up. |
| Down | Shift + S | Moves camera down. |
Object Selection
Here are the different ways you can select objects.
| Action | Control | Behavior |
|---|---|---|
| Select single object | double-left-click on object | Selects clicked on object and deselects all other objects. If the object is part of a group, the whole group is selected. A box around the object indicates that it is selected. |
| Toggle-select objects | shift + double-left-click on objects | Toggles selection of clicked on object. Preserves existing selections. |
| Box select objects | left-click + right-click + drag, or left-click + 'b' + drag | Selects all objects whose centers lie within box drawn on screen. Deselects all other objects. |
| Box add to selection | shift + left-click + right-click + drag, or shift + left-click + 'b' + drag | Adds all objects whose centers lie within the drawn box to the selection. Preserves existing selection. |
| Select decal or object that is under another decal | mouse wheel up/down | When you have 2 or more objects or decals on top of each other, you can select at least 1 decal or object, put your mouse cursor on top of the one you want to select, then use the scroll wheel to switch your selection between the objects. |
| Select all | cmd-a | Selects all objects. |
| Deselect all | double-left-click away from all objects | Deselects all objects. |
Note: If the Debug window is open (Top Bar -> Windows -> Debug Window), then when you select an object some useful information will appear. It shows you what xml file the object is created from, its unique object id, and what type of object it is.
Transformations
For all transformations:
- In order to transform an object you must first select it.
- Hold ctrl to make movements snap to half-meter increments.
- Hold alt to clone and transform the selected objects, leaving the original objects behind.
- Left-click transforms objects on all axis. Right-click transforms on the two axis that are perpendicular to the side of the bounding box you click on. Holding shift and right click locks the transformation to the axis parallel to the bounding box face you click on.
- Groups are transformed around the group center. Ungrouped objects, even if multiple are selected and transformed at once, are transformed around their own individual centers.
Translation
Hover mouse over central region of a bounding box' face, or hold 't'.
| Action | Control | Behavior |
|---|---|---|
| Camera relative | left-click + drag | Translates clicked on object along plane parallel to the screen. |
| Locked to plane | right-click + drag | Translates clicked on object along plane of clicked on face. |
| Locked to line | shift + right-click + drag | Translates clicked on object along normal of clicked on face. |
| force decal(s) to map only one object/group | hold i | selected decal will only map with that object that is directly underneath your mouse |
| force decal(s) to project only on selected objects | press o | selected decal will only map with that object that is directly underneath your mouse |
| projection box/angle | press p | to make projection box for decal |
Scale
Hover mouse near bounding box corners, or hold 'e'.
| Action | Control | Behavior |
|---|---|---|
| All dimensions | left-click + drag | Scales clicked on object in all dimensions (x, y, and z) at once. |
| Locked to plane | right-click + drag | Extends clicked on object along plane of clicked on face. |
| Locked to line | shift + right-click + drag | Extrudes clicked on object along normal of clicked on face. |
Mirror
Just use the right-click scale tool, and scale down the object until it flips and its mirror image begins scaling up!
Rotation
Hover mouse near bounding box edges but away from the corners, or hold 'r'.
| Action | Control | Behavior |
|---|---|---|
| Free | left-click + drag | Rotates clicked on object as if you are pushing the surface of a ball. |
| Locked to axis | right-click + drag | Rotates clicked on object about normal of clicked on face. |
Debug Window
Just below the top bar menu, on the left side, is a space for debug information.
This window is only visible if you have the Debug Window enabled (Top Bar -> Windows -> Debug Window).
It will tell you information about the selected object, checkpoint progress (if checkpoints are enabled in this level), and a warning if the nav mesh needs to be updated.
The bar across the top of the window is the editor menu. Many editor functions can be found here, but some functions can only be reached via hotkeys for now.
'Cmd' refers to the '⌘' key on Macs, and the 'ctrl' key on PCs.
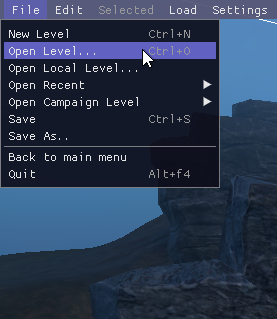
Contains file operations for loading and saving levels.
| Button | Hotkey | Effect |
|---|---|---|
| New Level | - | Opens a new empty level in the editor. |
| Open Level... | - | Opens a file browser where you can pick what level to load (starts in Data/Levels directory). |
| Open Local Level... | - | Opens a file browser where you can pick what level to load (starts in last used directory). |
| Open Recent | - | Re-open one of the most recently opened levels in the editor. |
| Open Campaign Level | - | Open one of the levels from the main Overgrowth story mode. |
| Save Level | cmd+s | Overwrites the currently opened level file with any changes you made. |
| Save As... | - | Opens a file browser where you can pick a new or existing file to save the level to. |
| Back to main menu | - | Leave the editor and return to the main menu. |
| Quit | - | Quit the game. |
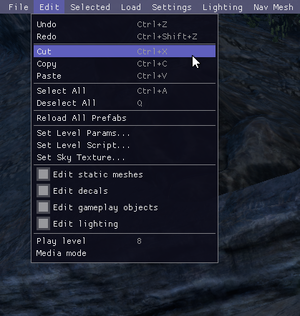
Contains basic editing functions. Also contains properties for the level.
| Button | Hotkey | Effect |
|---|---|---|
| Undo | cmd+z | Undo the most recent action. |
| Redo | cmd+shift+z | Redo the most recent action. |
| Cut | cmd+x | Puts the selection into the clipboard and removes the selected objects. |
| Copy | cmd+c | Puts the selection into the clipboard. |
| Paste | cmd+v | Pastes the clipboard on the cursor position. |
| Select All | cmd+a | Select all of the objects in the level. |
| Deselect All | q | Clear the current selection. |
| Reload All Prefabs | - | Force a reload of all prefab objects in the level. |
| Set Level Params... | - | Set global level parameters (sun settings, sky, fog, HDR, etc). |
| Set Level Script... | - | Select what script to use for this level. |
| Set Sky Texture... | - | Opens a file browser where you can pick what sky texture to use. |
| Edit static meshes | cmd+1 | Toggle ability to select non-moving objects (rocks, etc). |
| Edit decals | cmd+2 | Toggle ability to select decals. |
| Edit gameplay objects | cmd+3 | Toggle ability to select characters, hotspots, etc. |
| Edit lighting | - | Toggle ability to select lights. |
| Play level | 8 | Enter play mode. |
| Media mode | - | Enter a disembodied camera mode, for taking screenshots and videos. |
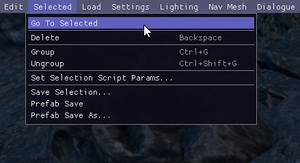
Contains operations for working with the current selected objects.
| Button | Hotkey | Effect |
|---|---|---|
| Go To Selected | f | Move the camera to frame the selected objects. |
| Delete | backspace | Delete the selected objects from the level. |
| Group | cmd+g | Merge the selected objects into a group. |
| Ungroup | cmd+shift+g | Break up all groups that are selected. |
| Set Selection Script Params... | - | Open up the selected object window, and expand the "Script Params" section for the selected objects. |
| Save Selection... | - | Open up the file browser to save the selection as an object template.
Object templates can be loaded like any other object. Script params and transform are saved. If you edit a template, it won't be updated in any level it is placed in. |
| Prefab Save | - | Save any changes to the selected prefab to a file, or create a new prefab file from the selection.
Object prefabs can be loaded like any other object. Script params, transform and connections are saved. If you edit a prefab, it will automatically be updated in all levels it is placed in. |
| Prefab Save As... | - | Open a file browser to save the selection as a new prefab file.
Object prefabs can be loaded like any other object. Script params, transform, and connections are saved. If you edit a prefab, it will automatically be updated in all levels it is placed in. |
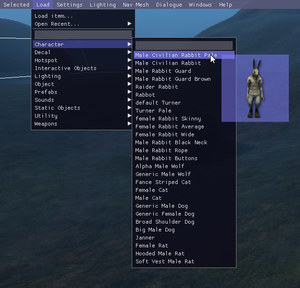
Contains operations for loading and spawning objects into the level.
| Button | Hotkey | Effect |
|---|---|---|
| Load item... | - | Open a file browser to pick an item to spawn in. After loading, click in the level to spawn the object. |
| Open recent... | - | Pick an item you've recently spawned to spawn another instance. After loading, click in the level to spawn the object. |
| <Rest of menu> | - | Search or click on an item from a list to spawn in. After loading, click in the level to spawn the object.
Hover over an item to see a thumbnail preview of the item. |
Tools for editing global illumination.
Note: Use of this menu is deprecated. We recommend you use sun lighting, and Dynamic Light objects (in Top Bar -> Load) instead.
| Button | Hotkey | Effect |
|---|---|---|
| Calculate GI first pass | - | Calculates (or re-calculates) first pass for light probes to give a quick preview of lighting. |
| Calculate GI second pass | - | Calculates second pass for light probes to give a better result (takes longer). |
| Probe lighting enabled | - | Enable probe lighting. |
| Show probes through walls | - | Toggle rendering of light probe previews through walls. |
| Show tet mesh | - | Toggle rendering of tetrahedral mesh lines (generated by light probes) to see how they are connected. |
| Show probes | - | Toggle rendering of light probe previews. |
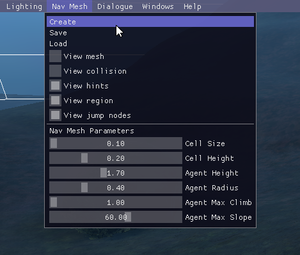
Tools for nav mesh generation, loading, saving and viewing.
| Button | Hotkey | Effect |
|---|---|---|
| Create | - | Generates a new navigation mesh. |
| Save | - | Save the current nav mesh to disk. |
| Load | - | Load a previously saved nav mesh from disk. |
| View mesh | - | Toggle preview render of the nav mesh. |
| View collision | - | Toggle preview render of the collision mesh the nav mesh is based on. |
| View hints | - | Toggle preview render of navmesh_hint objects (which force mesh generation). |
| View region | - | Toggle preview render of navmesh_region objects (which restrict mesh generation). |
| View jump nodes | - | Toggle preview render of navmesh_connection objects (jump nodes). |
| Cell Size | - | Change the width of cells in the nav mesh
smaller: handles smaller gaps, slower to build. |
| Cell Height | - | Change the height of cells in the nav mesh
smaller: finer control on ramps, slower to build. |
| Agent Height | - | Change the height of fake player used to create nav mesh
smaller: handles lower overhangs, more likely to be unreachable by real characters. |
| Agent Radius | - | Change the width of fake player used to create nav mesh
smaller: handles smaller gaps, more likely to be unreachable by real characters. |
| Agent Max Climb | - | Change the max height of blocks that fake player will climb to create nav mesh
too high: real characters can't climb it. |
| Agent Max Slope | - | Change the max angle of ramps that fake player will walk up to create nav mesh
too high: real characters will go up steep hills. |
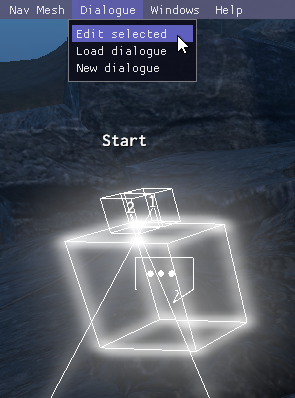
Tools for dialogue editing.
| Button | Hotkey | Effect |
|---|---|---|
| Edit Selected | - | Start editing the selected dialogue (make sure you select it first!). |
| Load Dialogue | - | Load a previously saved dialogue text file. |
| New Dialogue | - | Create a new dialogue object (click this, then click to place it in the level). |
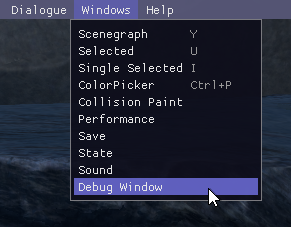
Launch various editor windows, color picker, and debug windows.
| Button | Hotkey | Effect |
|---|---|---|
| Scenegraph | y | Open level properties, and a searchable list of items in the level.
Hint: Click items in the list to select/deselect them, and hit F to view the selected items. |
| Selected | u | Open the properties for the selected objects. |
| Single Selected | i | Open the properties for a single selected object. This menu doesn't require you to drill down to edit properties. |
| ColorPicker | cmd+p | Open the Color Picker to let you tint objects. http://wiki.wolfire.com/index.php?title=Editor_Interface#Color_Picker |
| Collision Paint | - | Open the Collision Paint menu to let you edit physics properties on objects or individual surfaces. |
| Performance | - | Open a window to monitor performance, and view a list of loaded file assets/loaded textures, for debugging. |
| Save | - | Open a window to view data in the save file, for debugging. |
| State | - | Open a window to view a hierarchy of loaded script contexts, for debugging. |
| Sound | - | Open a window to view a list of loaded sounds, for debugging. |
| Debug Window | - | Open a window to view debug text (shows various game and editor state). |
Functions Without Buttons
Some functions are only reachable via hotkeys, here are a list of those.
| Action | Control | Behavior |
|---|---|---|
| Make player-controlled | Shift+Cmd+P | Toggles whether a character is controlled by a human or by AI. A human-controlled character's spawn box has a green outline, an AI-controlled character's box has white outlines. If two characters are set to be human-controlled Overgrowth will start in split-screen mode the next time game-play is resumed from editor mode. The second player will be controllable via a USB controller. |
| Parameter Editor | U (with object selected) | Opens the parameter editor to modify parameters of the selected object. |
| Palette Editor | Cmd+P (with character selected) | Brings up a dialog to modify colors of different parts of the character. |
| Color Picker | Cmd+P (with object that is not a character selected) | Brings up a dialog that can be used to tint the color of any selected objects. |
| Spawn Dead | Cmd+K or Ctrl+K (with character spawn selected) | Makes selected characters spawn dead. It will spawn at the point it went into ragdoll mode (which may cause it to spawn "dead" while standing up). If you want to update the pose for the dead body then move the body, select the spawn point, and hit the hotkey again to save its new position. |
| Spawn Alive | K (with character spawn selected) | Makes selected characters spawn alive. |
Selected Window (object parameters editor)
TODO: Probably need to add a link to a section containing character parameters. Possibly other special object parameters as well
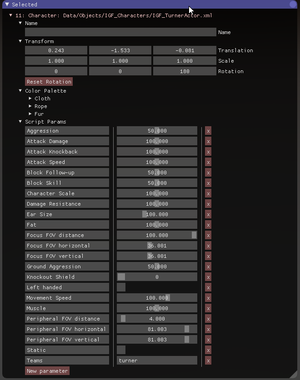
The Selected Window (or parameter editor) lets you change different parameters depending on which objects you have selected.
You can bring up the parameter editor for an object (or set of objects) by selecting them and pressing the U key, or clicking Top Bar -> Windows -> Selected.
Here is a description of what each parameter does:
| Parameter | Description |
|---|---|
| Name | Give an object a custom name, so you can find it in the scenegraph window (see below), or let a custom script find those objects so they can do special things to them. |
| Transform | Adjust the position, rotation, and scale of the objects manually. There is also a button to reset the rotation (which is useful when creating object prefabs). |
| Color Palette | Tint objects, or make them super bright. If the character provides a mutli-part color palette, set different colors on different parts. |
| Script Params | Custom parameters used by scripts. Each different object type can define their own script params. |
Scenegraph Window (level parameters editor)
TODO: Need to add missing parameters, and describe the object list/search/flat/named-only
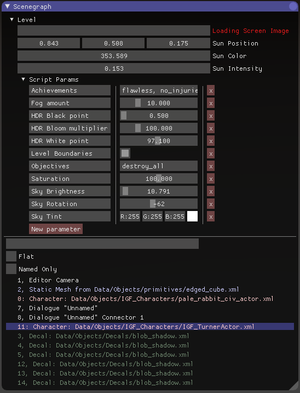
The Scenegraph Window (or parameter editor) lets you change global level parameters (sun, loading screen image, sky, etc), or find objects in the level.
Open up the Scenegraph for the current level by pressing the Y key, or clicking Top Bar -> Windows -> Scenegraph.
Here is a description of what each parameter does:
| Parameter | Description |
|---|---|
| Achievements | Decide which challenges you can complete on the level, they appear on the level end screen. |
| Fog amount | Sets the thicknoess of the atmosphere and thus how far you can see. |
| HDR Black point | Sets what brightness should be regarded as black. |
| HDR Bloom multiplier | Decides how much light pixels bleed. |
| HDR White point | Sets what brightness should be regarded as white. |
| Level Boundaries | If this is checked characters will be pushed back into the level when they try to go past a certain point. |
| Objectives | Set the goal of the level. |
| Sky Brightness | Adjust how bright the sky should be. |
| Sky Rotation | Move the sky around. |
| Sky Tint | Makes the sky have a specified color. |
Color Picker
TODO: Need to add info or a link to a description of special object parameters that are controlled by color, like Water Froth movement, etc
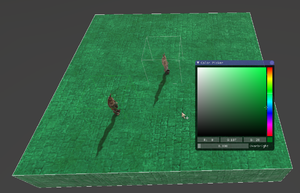
The Color Picker is used to tint the color of selected objects.
It is opened by pressing CTRL+P (For Mac users: Command+P), or Top Bar -> Windows -> ColorPicker.
The color picker consists of a color-gradient box, a rainbow slider, the RGB values, and an overbrightness slider. Increasing overbrightness makes the color brighter, and makes it glow in the dark.
For characters, the color picker will let you set the color of different parts of the character. This is only available if the character was built to support a multi-color palette (not all of them do).
Save Selected Objects
TODO: This is referred to as "object templates" above, in the Edit menu's description (but not in the name of the command). The hotkeys may not be accurate anymore. A description should be added that describes how it works, and how it is different from a prefab (because it doesn't auto-update. It might also not support connections?)
Once you have created something you wish to use elsewhere, press Ctrl+Shift+S (On Windows) or Command+Shift+S (on Mac) to open an object saving dialog. This way, you can save buildings, trees or obstacle courses made from many parts as a single XML object, ready to be imported back to Overgrowth.
Sun Editor
TODO: Need screenshots of the main sun editor, and need to describe how it can also be edited in the scenegraph/"level parameters"
To edit the sun, find it in the sky and double-click it. Now you can click and drag on the circle to change the intensity of the sun, click and drag on the dot to change the color and click and drag on the sun itself to move it around the sky.
Dialogue Editor
TODO: Need to verify this is all accurate, up to date, and complete. It probably needs its own article, with screenshots. Also needs to carefully describe what lines you need to have selected in the editor for it to work properly (animations, object and camera positioning, etc, are very sensitive to which line is selected)
The dialogue editor is used to create scenes with different camera angles, text and poses. It is commonly used to give context and progress the story in a level.
Getting Started
Write the dialogue
Create a text file in your mods Dialogues folder (../Overgrowth/Data/Dialogues) and write the dialogue in it like this.
#name "Mirage"
#participants 1
say 1 "Thorn" "You there!"
say 1 "Thorn" "Do you have any..[wait 0.4] water?"
- The #name "Mirage" is the name of the scene. This is given to a dialogue hotspot on so it knows which dialogue to activate.
- The #participants 1 is how many characters there are in the scene. The numbered boxes above the dialogue object are connected to spawn points to decide which character is which in this scene.
- say at the beginning of a line is used to make someone say something.
- The 1 is the ID of the participant that should say the dialogue, this decides who moves their mouth when the dialogue appears.
- "Thorn" is which name should appear for the dialogue
- The text within the quotes at the end of the line is the dialogue itself.
- The [wait 0.4] will make the dialogue text pause for 0.4 seconds before continuing to display the next text.
Save and close the file.
Set up the scene
Open up your level in the game, go to the Dialogue tab in the ribbon and click Load Dialogue. Select the dialogue file you created and click in your level to spawn it there.
There is a small box above the dialogue object that you just created. Select this object and alt-click on a character to tell the game that the participant with ID 1 is that character.
Select the box and press Edit Selected, bringing up the text of the dialogue on the screen. Use the arrow up and down keys to select what line in the scene you want to edit. Now press Toggle Recording, which creates a few more useful objects in our scene:
- Camera (with accompanying preview window)
- Torso control
- Head control
- Eye control
Move the camera to choose where the camera will be when the dialogue reaches the selected line, scale it to zoom in or out. Move the torso, head and eye controls to choose where the character's torso, head and eye should be pointing at that point. You need to scale up the torso and head controls for them to have any effect.
Press Load Pose and find the files with names that start with r_dialogue, find one that you think might fit and load it to make the character take that pose when the scene loads.
Press Preview Dialogue to test the scene. When you're happy, click Toggle Recording again to turn it off and press Save Dialogue to save your changes to the scene.
Trigger the scene
Now we have the scene set up, but we don't have anything that triggers it yet. We can use a dialogue hotspot to make that happen. So go to the Home tab and press Load Item, go to the Hotspots tab, click the Start Dialogue hotspot and click on the ground in your level. This should spawn a wireframe cube with a green sign icon in.
The dialogue will trigger when the player enters this hotspot, so place it where it will trigger when you want it to. Just make sure the player spawn is not inside of the hotspot, as that won't work when the level is restarted.
Press U with the hotspot selected and change the Dialogue property to be the same as the #name setting in the dialogue you want to trigger. If you've followed this example, that would be Mirage. If you don't want the dialogue to automatically trigger when you enter the hotspot, uncheck the "Automatic" checkbox.
Now save your level, start playing, enter the hotspot, and the dialogue should trigger!
Spawn Corpse
TODO: Verify this is all accurate, add screenshots, add note that if you try to save a corpse while the character is alive that it will be a "corpse" standing up, looking possibly alive until you attack it
To make a character spawn as a corpse, select it and press ctrl/cmd + K to turn on corpse mode. The character will now be a corpse when it spawns. If you want to place the corpse in a specific location or position, you can drag the corpse to where and how you want it, then hit ctrl/cmd + K with the spawn box selected a second time to save its resting position as its new corpse spawn location/position.
If you want to make a character spawn normally instead of as a corpse, select its spawn point, and press K.
