Editor Interface: Difference between revisions
No edit summary |
No edit summary |
||
| Line 96: | Line 96: | ||
[http://blog.wolfire.com/2009/03/map-editor-controls/ Philip's Map Editor Controls] - [http://forums.wolfire.com/viewtopic.php?f=13&t=4148 SPF Forum] | [http://blog.wolfire.com/2009/03/map-editor-controls/ Philip's Map Editor Controls] - [http://forums.wolfire.com/viewtopic.php?f=13&t=4148 SPF Forum] | ||
[[Category:Tutorials]] | [[Category:Tutorials]] | ||
[[Category:Overgrowth]] | |||
[[Category:Editing]] | |||
Revision as of 13:12, 1 January 2010
![]() Work in Progress: Comments & Edits Welcome
Work in Progress: Comments & Edits Welcome
Basic Controls
When you start up your Overgrowth Alpha, you'll probably be faced with dozens of questions. "What should I do?," "How do I work the tools?," and "How far can I edit Overgrowth?" are few of the many questions that will be answered in this section. However, it could be profitable for you to also try to experiment on your own. The more you learn on your own, the more likely you'll be comfortable with the interface. Firstly, it is important that you get familiar with the tools and information you have at your command in game.
The Interface
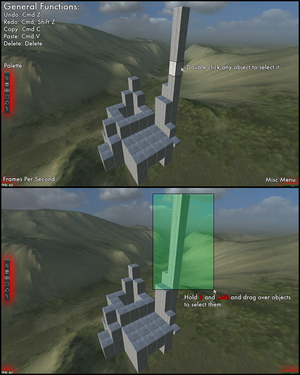
Firstly, we'll make sense of the information and windows accessible from in game. To begin with, you have the most noticeable window; the palette. This palette is very important because it contains all of the tools you'll use to edit and manipulate objects, decals, and hotspots. We'll explain more of the palette soon. Secondly, in the bottom left of your screen you'll see a number after the letters "FPS". Obviously, this means "Frames per Second". Overgrowth is incredibly de-optimized at this current stage, so most likely once you start getting some objects in there your FPS will go down considerably. Do not worry, some day this shall be changed, even then it's hard to get to a point where the FPS reaches low numbers.
Then we have the 'Misc Menu' on the bottom right of your screen. It should be hidden to begin with, but if you drag it upwards you should reveal that it is rather intricate. Firstly, you have the 'Live Shadow Update' on/off switch. This simply means that if you have shadows calculated, this will enable the shadows to update if an object moves. 'Calculate Shadows' and "Calculate AO' are the next switches on the Misc Menu. Calculate shadows (obviously) calculates the shadows for the map and all objects in it. Calculate AO turns the Ambient Occlusion on, which really just makes the map look prettier. Warning: Calculating either of these generally freezes Overgrowth up for sometimes over 15 minutes.
Next is the 'FOV' Scroller. This is comparable to changing the lens of a camera. Scroller left, the closer things appear, scroller right, the farther the things appear. The standard is 90.30. Also dealing with the camera is the 'Camera Collision Detection' switch. This switch turns off and on the ability for the camera to have contact with objects. This is generally on by default, but I'd advise to turn it off for complicated maps where you may need to get somewhere faster. Everything from 'Translation Jitter' to 'Collide with Objects' deals with changing the settings of the 'Brush' tool. These options shall be explained rather shortly.
Now that all of the apparent menus and information have been explained, we'll go over one last feature; the Console. Currently, the console seems to be nonfunctional, however, when it does come into use it will be rather important. The console uses Javascript, a high powered code which allows for a lot of functions and such.
The Palette
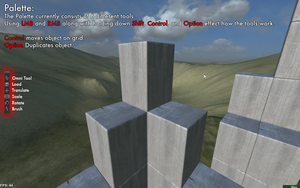
We've just gone over most of the general interface, now we shall go more in depth with the palette. Firstly, it's apparent that there are six tools, generally doing different things. To select any of these tools, simply click them once with the LMB. I've found it easy to accidentally not fully press a tool, so be aware. Here is a table of how to select each button.
| Load Button | Click ‘Load’ button or CMD 'L' | Pressing the 'Load' button will automatically open up a new browser in which you can load any object, decal, or hotspot into the game. |
| Translate Tool | Click ‘translate’ button or press ‘4′ | Sets tool to translate tool. When hovering over a selected object, cursor will indicate the currently chosen tool. |
| Scale Tool | Click ‘Scale’ button or press ‘5′ | Sets tool to Scale Tool. |
| Rotate Tool | Click ‘Rotate’ button or press ‘6′ | Sets tool to Rotate Tool. |
| Omni Tool | Click ‘Omni’ button or press ‘7′ | Sets tool to Omni Tool. This tool combines the Translate, Scale, and Rotate tool in one. |
| Brush Tool | Click ‘Brush’ button, or press '3' | Sets tool to Brush Tool. Hold P + LMB and drag. |
Now that you know what each tool is called it's almost time to move on to how they are specifically used. However, first it'd be best to go over the Browser first.
The Browser
The new browser combines the Object, Decal, and Hotspot browser into one functional one. For the most part, the object browser has almost every object listed in it as a image thumbnail, however if you've created your own object or want to load an object that isn't in the thumbnail form, you can simply press the 'Load External Object' button and search through the object folder with all the .xml's all over the place. You can also switch the tab to decal or hotspot browser, which also has all the assets in the thumbnail list. Also, by pressing the Heart located at the top right of every thumbnail, you can add to favorites and look at them in a separate section. Finally, one last feature is the search feature. Simply type the name of the .xml you're looking for and it'll pop up for you.
Okay, we're ready for some nice down and dirty work with the tools...
Using the Tools
So we've gone over the interface and how to access the tools, but now it's time to show you what each tool really does. As you can see below there is the actual palette. Familiarize yourself with it to make this process easier. Okay, now we'll start with the Translation tool first...
Translation Tool
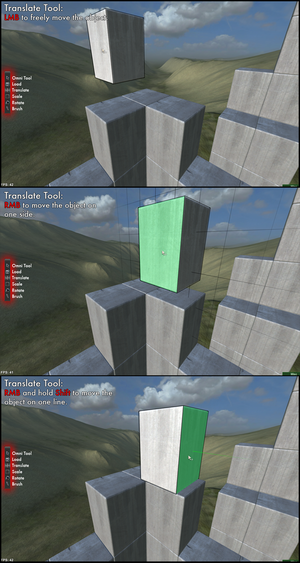
This tool, like all manipulation tools, can affect Objects, Decals and Hotspots in generally the same way. For simplicity's sake, we'll explain these tools in regards to objects only. When an object is selected, this tool allows you to move it's position. So really, 'translation' is really just a fancy word for the 'move tool'. When hold down LMB on an object, you can freely move it without being tied down by a grid or plane. However, all tools can be used differently. If you use RMB on one of the sides of the object, the object will move bound to that plane. This is useful when making walls, buildings, or even Crete structures because you can put an object on the surface of another object, and then edit the position without worrying about depth. If you use RMB + Shift on a side, the object will move bound to that side's perpendicular line. You can use this along with hold Option and Shift, which will duplicate the object, while being snapped to grid and moving on one line. Good for making towers, roads, and other such structures. Another way to use the Translate tool is to use your arrows. In summary, the Translation tool will be one of your most used tools, so get comfortable with it as much as possible.
Scale Tool
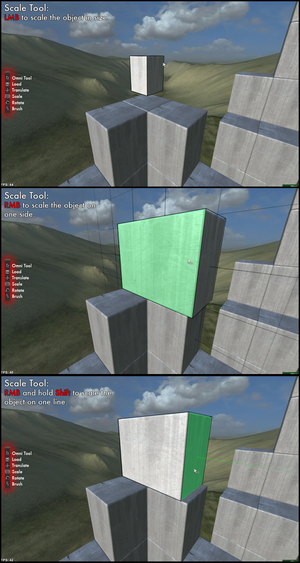
The Scale tool is probably most similar to the Translation tool out of all the tools at your command. However, in the process of making your project, remember to use Rabbot as a standard of size. What do I mean by this? Well, it can be hard to judge size without any reference point, so use Rabbot to make sure your stuff isn't too large or too small. Also remember that not all object scale graciously. Certain object loose much of their quality when significantly enlarged. Moving on, if you use LMB on the object, this tool will scale the object in size from the center. It's basically a 'Make bigger' or 'make smaller' tool with LMB. Now, when you use RMB on one side, this will scale the object bound to that side you used RMB on. Also, like the translation tool, you can use RMB + Shift on one side to scale bound to that side's perpendicular line. Using the 'Control' button with the scaling will snap the scaling to it's grid, however it seems as if it doesn't exactly coincide with the Translation's grid. Pretty much you'd have to see it for yourself to understand completely.
Also, another feature with the scaling tool is the ability to mirror your object. It's rather simple actually, simply use RMB + Shift + Control on one side, and then drag the mouse over past the opposite side. This, if done properly, will result in your object being completely mirrored beside it.
Rotate Tool
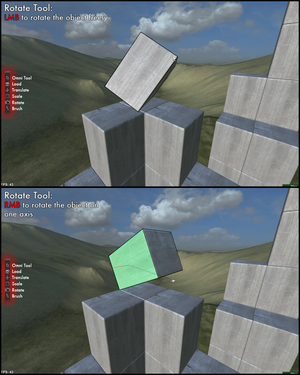
Now we have the last of the Manipulation tools, the Rotation Tool. This tool is actually slightly less complicated than the other's because it's function is easier to grasp. This tool actually had some trouble in the earlier stages of development because the snap to grid function (Control) didn't exactly work so well. Luckily for us now, the Rotate tool works pretty much perfectly. You can use LMB to free rotate the object, kind of like how LMB affect objects with the Translation tool. Free rotating an object is good for when you need to make ruins, or something more natural. After all, Overgrowth is all about the natural environment of the map. However, if you ever did want to get a more defined result with rotation tool, simply use RMB on one of the sides of the object to rotate on that side's perpendicular axis. Using Control with the Rotate tool is very important. For instance, when making a house and you have a wall, you need to make a right angle. Using RMB + Control on the top side of the wall, you can rotate it into a right angle.
Omni Tool
This tool combines the Translate, Scale, and Rotate tool into one tool. This is useful because it saves time that you'd normally spend changing tools. When using this tool there are two ways in which it determines what tool to use. Firstly, it determines this by where your curser is in relation to the object. For Translation, hover over the center of a side. For Scale, hover near the verticies of the object. For rotate, hover near the edge of the object. This takes some getting used to along with a good amount of precision. However, another way to determine which tool to use goes as: Translation, hold T. Scale, hold E, Rotation, hold R. Now, don't be surprised when you press R and a Ragdoll spawns. It turns out that this hotkey is used for two functions.
Brush Tool
This tool is different from the other tools listed because it's not a Manipulation tool, it's more like an 'Add Object' tool. The brush tool allows you add objects to a map quickly and seamlessly. All you have to do is load an object via the Object Browser, but before adding it to the map, switch to the brush tool and hold P + LMB and drag over the map. You should end up with the object you loaded being spread on the map near where your curser is moving. As mentioned before, the Misc Menu can also change how the Brush tool works. Editing all the 'jitter' sliders will change how the brush works, and you can even set it so you can brush over objects as well.
Summary
So, in total we went over the general interface of Overgrowth, and went in depth on the functions of the Palette. In truth, once you get a hang of using the tools it gets easier from there. Even when editing Decals or Hotspots, it's all just a process of getting used to the way the editor works. Also, feel free to use any of the tutorial images on the right side as quick reference guides incase you forget anything. Also, the two links below are incredibly useful, I'd highly recommend them.
Thanks to Phillip and the whole Wolfire team for any information I used from them.