Custom Animations: Difference between revisions
Moved Bone Layers section upwards |
→Overview: Hid the 2.55 tutorial in its own link, by the 2.55 download. |
||
| Line 1: | Line 1: | ||
==Overview== | ==Overview== | ||
Animations for rigged objects in Overgrowth are stored with one of the Phoenix Engine's custom [[Binary_File_Formats|binary file formats]], namely the [[Binary_File_Formats#PHXANM|PHXANM (Phoenix Animation) format]]. To export an animation to a PHXANM (File mask: .anm) file you need to use Wolfire's custom export addon for Blender. | Animations for rigged objects in Overgrowth are stored with one of the Phoenix Engine's custom [[Binary_File_Formats|binary file formats]], namely the [[Binary_File_Formats#PHXANM|PHXANM (Phoenix Animation) format]]. To export an animation to a PHXANM (File mask: .anm) file you need to use Wolfire's custom export addon for Blender. | ||
A repackaged version of '''Blender 2.55''' for Windows with the export addon and with the UI set up for this task can be downloaded [https://cdn.wolfire.com/techsupport/Blender-Overgrowth-Win.zip here]. | A repackaged version of '''Blender 2.55''' for Windows with the export addon and with the UI set up for this task can be downloaded [https://cdn.wolfire.com/techsupport/Blender-Overgrowth-Win.zip here]. [https://youtu.be/CuFKEvTyYRw You can find a tutorial on how to animate in this version here.] | ||
The scripts needed for using '''Blender 3.4''' and above are in the [https://discord.com/invite/wolfire Wolfire Discord's] #overgrowth_modding channel, in the pinned messages. Look for a file named phoenixblenderscripts.7z (instructions on how to install are included). | The scripts needed for using '''Blender 3.4''' and above are in the [https://discord.com/invite/wolfire Wolfire Discord's] #overgrowth_modding channel, in the pinned messages. Look for a file named phoenixblenderscripts.7z (instructions on how to install are included). | ||
Revision as of 21:17, 16 May 2023
Overview
Animations for rigged objects in Overgrowth are stored with one of the Phoenix Engine's custom binary file formats, namely the PHXANM (Phoenix Animation) format. To export an animation to a PHXANM (File mask: .anm) file you need to use Wolfire's custom export addon for Blender.
A repackaged version of Blender 2.55 for Windows with the export addon and with the UI set up for this task can be downloaded here. You can find a tutorial on how to animate in this version here.
The scripts needed for using Blender 3.4 and above are in the Wolfire Discord's #overgrowth_modding channel, in the pinned messages. Look for a file named phoenixblenderscripts.7z (instructions on how to install are included).
The best rig for making animations is rabbit_rig.blend -- This wiki page will assume you are using its default interface. TODO: How to switch to different species models?
Creating an animation
On the left hand side of your Blender character rig, you'll see a Dopesheet. If it's too small, you can drag it out and expand the border to see the full toolbar. This dopesheet contains a timeline of every keyframe defined for the animation.
In order to pose a character and make new keyframes, you must first select Pose Mode in the 3D Viewport's toolbar (located by default on its bottom). Then, you can select a bone and change it around. I recommend enabling Object Gizmos in the 3D Viewport's toolbar. Here's a quick reference for Blender 3.4's default interface controls:
- Left click to Select
- Right click to Manipulate
- Scroll wheel click to Orbit camera
- G to Translate selected (or rotate fixed bones)
- R to Rotate selected
- ESC to Cancel current change
Each keyframe contains data for a bone. Its position on the dopesheet dictates when the bone will conform to the pose. If you set the dopesheet's timeline over a keyframe, your changes to the bone will overwrite the current keyframe's data. You can change this behavior by checking the Record button's options on the timeline at the very bottom.
Selecting different poses

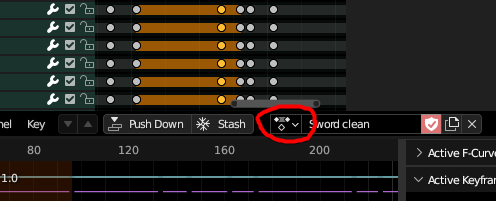
Click the button pictured on the Dopesheet's toolbar to browse and select the poses included in the character rig. Any rig has a maximum pose limit, which when reached will start recycling old poses. Todo: How large is this limit?
You can make a new pose by clicking the New Action button next to the pose name. Make sure not to overwrite any useful poses you may have in the rig!
Changing the start & end frames

How long your animation lasts depends on the values specified in Blender's Timeline window. In its top right, you can find the Start and End values. While the Use Preview Range button is toggled, the From Timeline button in the rig parameters will affect your exported animation's frame data.
Exporting an animation
- Create your custom animation in Blender
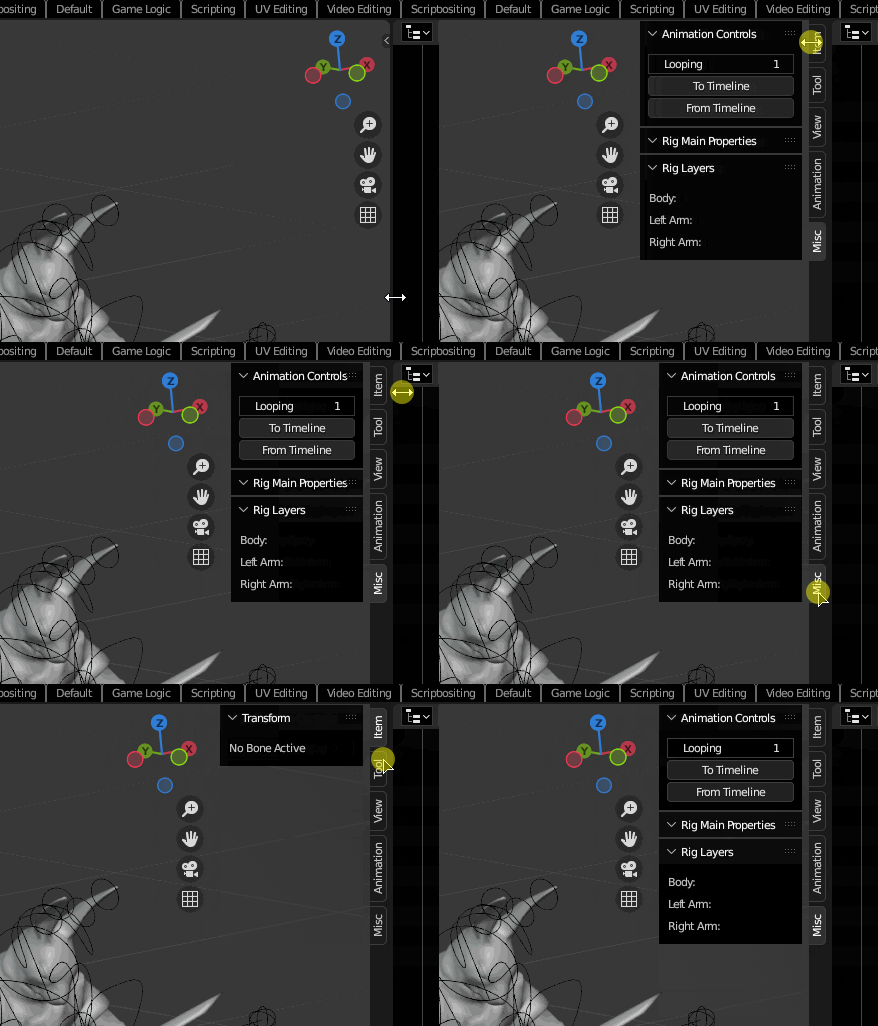
- Set the metadata for your animation in the sidebar of the 3D Viewport, as pictured below
- Click the From Timeline button to set the timeline's start & end frames as the start & end points of your animation; Note: Keyframes outside of this time frame won't be exported.
- Set the Looping value to 0 if you don't want your animation to loop. Set it to 1 if you want it to loop. Todo: If the value is higher, will it do sth different, like play the animation n times?
- With the skeleton selected, press File > Export > Phoenix Animation (.anm) Note: Make sure not to have any IK bones selected while in Pose Mode, or else the script may crash!
Bone layers

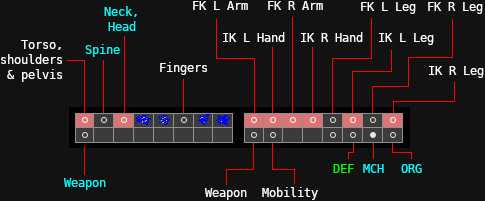
Sets of bones within the animation rig are hidden underneath several different layers. Each layer contains different bones; By hiding and unhiding specific layers, you can fine tune your available bones as pictured right.
FK stands for Fixed Kinematics, where each limb's position is manually set and is best used for dynamic animations with lots of movement (like attacks).
IK stands for Inverse Kinematics, where paws are placed and limbs follow.
To switch between the two modes of animation, you must set the IK property keyframe to 0 (for FK) or 1 (for IK). You can only set this property keyframe on IK bones.
In order to add event keyframes, you must first select a DEF bone. In the animation rigs that are shipped with the game, these bones are hidden. In order to unhide them, you must first:
- Enter Pose Mode in the 3D Viewport
- Go to the Object Data Properties tab (the one that looks like a character) in the Properties window
- Hold down SHIFT and toggle the third layer from the bottom right
- Once you're done, move your mouse to the 3D Viewport and press A to select everything
- Press ALT + H to unhide everything
- Toggle the rig layers back to normal: The DEF bones are located in the 3rd of the rig's layers from the bottom right TODO: ADD IMAGE
Event Keyframes
Event keyframes are used to tell the game at which moment of an animation an event is going to happen. This is used to trigger attack impacts and footstep sounds among other things. An event is saved as a Custom Property of a bone in the Blender files shipped with the game. Access these custom properties by clicking on the Bone Properties tab within the Properties window.
| Event Name | Description |
|---|---|
| event_attackimpact | Will trigger the actual impact while attacking a character |
| event_blockprepare | Signals when AI characters should block. These keyframes are usually placed two frames before the impact |
| event_attackblocked | |
| event_rightcrouchwalkstep | Will trigger footstep sounds for sneaking, emits AI sound and creates particles while on terrain |
| event_rightrunstep | Will trigger footstep sounds for running, emits AI sound and creates particles while on terrain |
| event_rightwalkstep | Will trigger footstep sounds for walking, emits AI sound and creates particles while on terrain |
| event_rightwallstep | Will trigger footstep sounds for wall running and emits AI sound |
| event_golimp | Causes the character to ragdoll into a static pose |
| event_grabitem | |
| event_heldweaponswap | Causes the character to switch the currently held item's handedness |
| event_rightweaponrelease | Causes the character to let go of the right hand's currently held item |
| event_sheatherighthandlefthip | Sheathes the right hand's item to the left hip |
| event_sheatherighthandrighthip | Sheathes the right hand's item to the right hip |
| event_throatcut | |
| event_unsheatherighthandlefthip | Unsheathes the left hip's item into the right hand |
| event_unsheatherighthandrighthi | Unsheathes the right hip's item into the right hand |
Adding an event Keyframe to your animation
- Select the 3rd of the rig's layers from the bottom right, as shown in the Bone Layers section
- Select the appropriate bone for the event you want to trigger while being in pose mode
- Set the playhead in the timeline to the moment you want the event to happen
- In the Properties editor, press Bone and scroll down to Custom Properties
- Hover over the property that corresponds to the event you want to trigger and press I to add a keyframe. (Value doesn't matter)
Animating Morph Targets
Todo: Add this section