Editor Interface
![]() Work in Progress: Comments & Edits Welcome
Work in Progress: Comments & Edits Welcome
Contents
Introduction
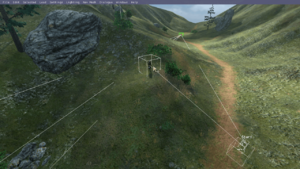
This page details all the interface elements found in the Overgrowth level editor, which can be accessed by pressing 9 when in the game.
Note: A fair number of tools and functions are inaccessible from the editor interface, to find out how to access these, or if you're looking for a control/hotkey reference, go to the Control Reference.
Ribbon User Interface
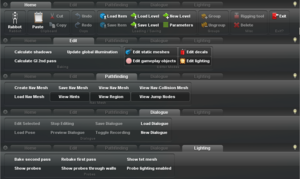
The horizontal bar across the top of the window is called the ribbon. All editor functions can be found here with a few exceptions as some functions can only be reached via hotkeys for now.
Since this is alpha software, some buttons simply don't do anything at all.
Home
Contains the most common tools.
| Button | Hotkey | Effect |
|---|---|---|
| Rabbot | 8 | Enter play mode. |
| Paste | cmd+v | Pastes the clipboard on the cursor position. |
| Cut | cmd+x | Puts the selection into the clipboard and removes the selected objects. |
| Copy | cmd+c | Puts the selection into the clipboard. |
| Undo | cmd+z | Undo the most recent action. |
| Redo | cmd+shift+z | Redo the most recent action. |
| Load Item | cmd+c | Opens the item browser. |
| Save Item | cmd+c | Opens a save dialog to save selected objects. |
| Load Level | - | - |
| Save Level | cmd+s | Overwrites the current level with any changes. |
| New Level | - | - |
| Parameters | - | Opens the parameter editor for the loaded level. |
| Group | cmd+g | Groups the selected objects. |
| Ungroup | cmd+shift+g | Ungroups any selected groups. |
| Rigging tool | - | - |
| Delete | delete | Removes any selected objects. |
| Exit | alt+f4 | Closes the application. |
Edit
Contains tools more directly related to level editing.
| Button | Hotkey | Effect |
|---|---|---|
| Calculate shadows | - | Starts baking shadows. |
| Calculate ambient occlusion | - | Starts an ambient occlusion bake. |
| Miss object tool | - | - |
| Material editor | - | - |
| Shader editor | - | - |
| Isolate | - | - |
| Projector box display | - | - |
| Surface display | - | - |
| Object editor active | cmd+1 | Toggle ability to select objects. |
| Hotspot editor active | cmd+3 | Toggle ability to select hotspots. |
| Decal editor active | cmd+2 | Toggle ability to select decals. |
| Physics editor active | - | - |
Pathfinding
Tools for nav mesh generation, loading, saving and viewing.
| Button | Hotkey | Effect |
|---|---|---|
| Create Nav Mesh | - | Generates a new navigation mesh. |
| View Nav Mesh | - | Renders the current nav mesh in the 3D view. |
| Save Nav Mesh | - | Save the current nav mesh to disk. |
| Load Nav Mesh | - | Load a previously saved nav mesh from disk. |
Dialogue
Tools for dialogue editing.
| Button | Hotkey | Effect |
|---|---|---|
| Edit Selected | - | ? |
| Load Pose | - | ? |
| Stop Editing | - | ? |
| Preview Dialogue | - | ? |
| Save Dialogue | - | ? |
| Toggle Recording | - | ? |
| Load Dialogue | - | ? |
Test
Contains an experimental tool for using the terrain to carve into objects.
| Button | Hotkey | Effect |
|---|---|---|
| Carve Against Terrain | - | Carves into selected objects with the terrain. |
These functions are used when the Editor Interface is active.
'Cmd' refers to the '⌘' key on Macs, and the 'Ctrl' key on PCs.
Camera Movement
| Action | Control | Behavior |
|---|---|---|
| Forward | W | Moves camera forward. |
| Backward | S | Moves camera backward. |
| Left | A | Moves camera left. |
| Right | D | Moves camera right. |
| Up | Shift + W | Moves camera up. |
| Down | Shift + S | Moves camera down. |
Tool/Mode Selection
| Action | Control | Location | Behavior |
|---|---|---|---|
| Omni Tool | Click the Omni-Tool Button | Floating Toolbar | Allows simultaneous use of the Translate, Scale, and Rotate tools depending on context. |
| Translate | Click 'translate' button | Floating Toolbar | Click and drag to translate objects |
| Scale | Click 'scale' button | Floating Toolbar | Click and drag to perform a generic scale and right click and drag to perform a scale based on the plane the mouse is over with regard to the selected object. |
| Rotate | Click 'rotate' button | Floating Toolbar | Click and drag to perform a generic rotation and right click and drag to perform a rotation only involving the plane the mouse is over with regard to the selected object. |
| Paintbrush | Click 'paintbrush' button | Floating Toolbar | This tool appears to be broken in the current release (a201) |
| Game mode | Click 'Rabbot' or press 8 | Home Tab | Switch to play mode. (from editor mode) |
| Editor mode | press '9' or ESC | None | Back to editor mode. (from play mode) |
| In game webbrowser | press 'F1' | None | Open the in game webbrowser. |
| Object browser | Load Item Button | Home Tab | Opens the object browser. Click on an object and then left click in the editor to place it. Currently all "active" weapons have the prefix "weapon_" in the "o2" tab. To import items not shown click the folder icon on the object browser. |
| Decal Selection tool /decal editor mode | press 'cmd-2' | None | To enter Decal selection/editor tool (This appears to have been removed in the current version, a201) |
Object Creation
| Action | Control | Behavior |
|---|---|---|
| Load Object | cmd-l (or click 'load' button) + left-mouse-click | Opens up a dialogue box in which the user may specify an xml file containing object data (anything in "./Data/Objects" or "./Data/Levels"). Places selected objects in scene, centered at mouse click. |
| Copy Objects | cmd-c | Copies all selected objects (and their relative placement) into a copy buffer. |
| Paste Objects | cmd-v | Adds to scene all objects in the copy buffer. Centers objects at mouse location. |
Object Selection
| Action | Control | Behavior |
|---|---|---|
| Select single object | double-left-click on object | Selects clicked on object and deselects all other objects. If the object is part of a group, the whole group is selected. Bounding box and slight glow indicate object is selected. |
| Toggle-select objects | shift + double-left-click on objects | Toggles whether or not clicked on object is selected. Preserves other existing selections. |
| Box select objects | left-click + right-click + drag, or left-click + 'b' + drag | Selects all objects whose centers lie within box drawn on screen. Deselects all other objects. |
| Box toggle-select objects | shift + left-click + right-click + drag, or shift + left-click + 'b' + drag | Toggles selection state for all objects whose centers lie within box drawn on screen. Preserves other existing selections. |
| Select decal that is under another decal | mouse wheel up/down | This onley works when you have atleast 2 decalsand one is on top of another. You need to select atleast 1 decal first and your mouse cursor needs to be on top of that one you want to select to do it |
| Select all | cmd-a | Selects all objects. |
| Deselect all | double-left-click away from all objects | Deselects all objects. |
Change Object Properties
| Action | Control | Behavior |
|---|---|---|
| Make player-controlled | Shift+Cmd+P | Toggles whether a character is controlled by a human or by AI. A human-controlled character's spawn box has a green outline, an AI-controlled character's box has white outlines. If two characters are set to be human-controlled Overgrowth will start in split-screen mode the next time game-play is resumed from editor mode. The second player will be controllable via a USB controller. |
| Parameter Editor | Press U | Allows you to modify character parameters such as team, attack speed, and handedness. |
| Palette Editor | Press 'Cmd+P' | Allows you to modify character colors including but not limited to Leather, Fur, Pants, and Shirt. These color fields are different between the characters. |
Transformations
For all transformations:
- In order to transform an object you must first select it.
- Hold ctrl to make movements snap by discrete increments.
- Hold alt to transform a clone of an object (or multiple objects), leaving the original object behind
- Left-click controls a 'generic' version of the transformation; right-click controls a version of the transformation contextually specific to the clicked on face. Holding shift locks the transformation to a single axis.
- Groups are transformed about the group center. Ungrouped objects, even if multiple are selected and transformed at once, are transformed about their own individual centers.
Translation
Set tool to 'translation', or set tool to 'omni tool' and hover mouse over central region of a bounding box face, or set tool to 'omni tool' and hold 't'.
| Action | Control | Behavior |
|---|---|---|
| Camera relative | left-click + drag | Translates clicked on object along plane parallel to the screen. |
| Locked to plane | right-click + drag | Translates clicked on object along plane of clicked on face. |
| Locked to line | shift + right-click + drag | Translates clicked on object along normal of clicked on face. |
| force decal(s) to map only one object/group | hold i | selected decal will only map with that object that is directly underneath your mouse |
| force decal(s) to project only on selected objects | press o | selected decal will only map with that object that is directly underneath your mouse |
| projection box/angle | press p | to make projection box for decal |
Scale
Set tool to 'scale', or set tool to 'omni tool' and hover mouse near bounding box vertices, or set tool to 'omni tool' and hold 'e'.
| Action | Control | Behavior |
|---|---|---|
| All dimensions | left-click + drag | Scales clicked on object in all dimensions (x, y, and z) at once. |
| Locked to plane | right-click + drag | Extends clicked on object along plane of clicked on face. |
| Locked to line | shift + right-click + drag | Extrudes clicked on object along normal of clicked on face. |
Mirror
Just use the right-click scale tool, and scale down the object until it flips and its mirror image begins scaling up!
Rotation
Set tool to 'rotation', or set tool to 'omni tool' and hover mouse near bounding box edges, or set tool to 'omni tool' and hold 'r'.
| Action | Control | Behavior |
|---|---|---|
| Free | left-click + drag | Rotates clicked on object as if you are pushing the surface of a ball. |
| Locked to axis | right-click + drag | Rotates clicked on object about normal of clicked on face. |
Grouping
| Action | Control | Behavior |
|---|---|---|
| Group objects | cmd-g | All selected objects and groups are joined into a new group. Groups are hierarchical, so grouped groups are treated as subgroups. Objects in a group are selected as a unit and transform as a unit. |
| Ungroup objects | cmd-shift-g | All selected groups are disbanded at their outermost level. |
Undo/Redo
| Action | Control | Behavior |
|---|---|---|
| Undo action | cmd-z | Undoes the last completed action. |
| Redo action | cmd-shift-z | Redoes the last undone action. Redo-able actions are cleared whenever the user completes a new action.. |
Object Removal
| Action | Control | Behavior |
|---|---|---|
| Delete object | delete or backspace | Deletes all selected objects |
Saving
| Action | Control | Behavior |
|---|---|---|
| Auto-save | Automatic | Every 30 seconds or so the program automatically saves the entire level to the file "./Data/Levels/autosave.xml". |
| Save level | cmd-s | Saves entire level to the same path as the level was opened from, overwriting the old level file. |
| Save selected objects | cmd-shift-s | Saves-as all selected objects to a path specified by the user in a dialogue box. |
Warnings
Just below the ribbon on the left side is a space for warnings. These warnings will tell you if the nav mesh, ambient occlusion or baked shadows needs to be updated.
Item Browser
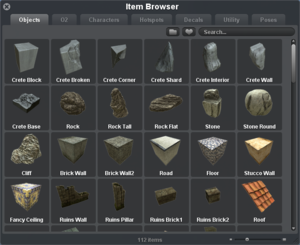
The item browser is used to browse for items that can be spawned in the levels. It is brought up by pressing the Load Item button under the Home tab. To spawn an item, click it and then click in the world to create the item on that location.
This list does not necessarily contain all the objects that can be spawned as all objects need to be manually added to the list. A file browser can be brought up by pressing the folder icon just under the tabs at the top. That file browser can be used to try loading any xml file, which is useful if you're trying to load a custom object that has not been added to the item browser for instance. The types of items that can be spawned are objects (static models), characters, weapons, hotspots, decals and spawn points.
Along the top of the window there are tabs for different categories of items. In the bottom right there is a slider to change the size of the thumbnail images as well as a grip that can be clicked and dragged to resize the window. A search field that searches in the currently open tab is located under the tabs to the right.
Hovering your mouse cursor over a thumbnail image causes a heart icon to appear on the thumbnail. If that heart icon is pressed the object is added as a favorite. To sort out any object that is not a favorite from the view, press the heart button right under the tabs at the top of the window. The favorites do not persist between closing and opening the item browser.
Color Picker
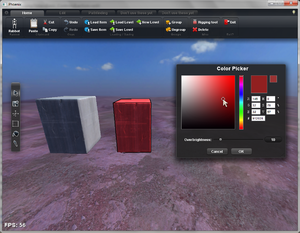
The Color Picker is used to tint the color of selected objects. It is opened by pressing CTRL+P (For Mac users: Command+P). The color picker consists of a color-gradient box, a rainbow slider, two boxes of different sizes showing the basic chosen color, RGB values, a hex value, and an overbrightness slider. Increasing overbrightness makes the color brighter.
Save Selected Objects
Once you have created something you wish to use elsewhere, press Ctrl+Shift+S (On Windows) or Command+Shift+S (on Mac) to open an object saving dialog. This way, you can save buildings, trees or obstacle courses made from many parts as a single XML object, ready to be imported back to Overgrowth.
Sun Editor
To edit the sun, find it in the sky and double-click it. Now you can click and drag on the circle to change the intensity of the sun, click and drag on the dot to change the color and click and drag on the sun itself to move it around the sky.


