Custom Characters
TODO: Put this link graciously provided by Markuss in its appropriate section:
https://cdn.wolfire.com/techsupport/ExampleMan.zip
TODO: Write introduction
Contents
Overview
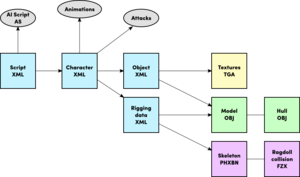
Characters in overgrowth consist of the following files.
| Name | File format | Description |
|---|---|---|
| Script | XML | Links the character xml with an AI script |
| Character | XML | Links an object xml with rigging data, animations and attacks |
| Object | XML | A regular object xml file, links to a model and textures |
| Rigging data | XML | Links a model and a skeleton together so the model can be animated |
| Textures | TGA | The textures used by the character |
| Model | OBJ | The 3D mesh used by the character |
| Hulls | OBJ | The simplified collision to use for the character |
| Skeleton | PHXBN | The bone structure used by the character for animation |
| Ragdoll collision | FZX | Convex hulls used for ragdoll physics TODO: Is this correct? |
To create a character for Overgrowth you need to...
- Model and texture the character (Guidelines)
- Create an object XML linking the model and the texture (Instructions)
- Rig the character using one of the included skeletons and export .phxbn, .fzx and .obj (Instructions)
- Create a rigging data XML linking the model and the skeleton (Instructions)
- Create a character XML linking the rigging data XML and the object XML with a set of attacks and animations the character should use (Instructions
- Create a script XML linking the character XML with an AI script (Instructions)
- Create a _hulls.obj model to allow for thrown weapons to hit the character
The script XML file is the file that's loaded in the game to create the character. This article goes through all the above steps.
Model and Texture Considerations
The model and textures for the character have the same requirements as when creating any other 3D Object, but with a few extra considerations.
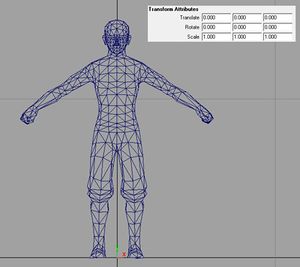
It's extra important for characters that the model is centered to the middle of the scene, standing on the grid floor with location and rotation set to zero, and scale set to one. It should loosely match the pose and proportions of the Overgrowth characters, you can use the following file for pose and size reference: ../Overgrowth/Data/Models/Characters/Rabbit/rabbit.obj.
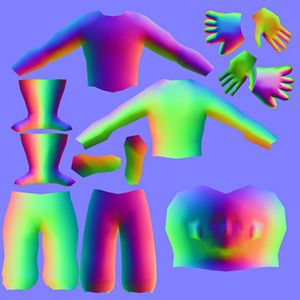
There is no character shader that supports tangent space normal maps. If you want to use a tangent space normal map anyway, the cubemap shader can be used. Though doing so will make the object look a bit different in the engine. More information about these shaders can be found in the 3D Objects article.
Fur Fins
TODO: Write about how fur fins work
Object XML
This is a regular object file as described in the 3D reference guide. Note that the ShaderName flags (like #TANGENT for instance) don't make any difference for characters since they use a pre-detemined path through the uber shader.
<?xml version="1.0"?>
<Object>
    <Model>Data/Custom/Markuss/ExampleMan/Models/ExampleMan.obj</Model>
    <ColorMap>Data/Custom/Markuss/ExampleMan/Textures/ExampleMan_Color.TGA</ColorMap>
    <NormalMap>Data/Custom/Markuss/ExampleMan/Textures/ExampleMan_Norm.TGA</NormalMap>
    <ShaderName>envobject</ShaderName>
</Object>
Once you have created this file for your character it's a good idea to see if everything is working so far by loading the object XML in the editor.
Rigging the Character
Overgrowth uses one of the custom binary file formats, namely the PHXBN (Phoenix Bones) format to store skeletons. To export a skeleton to a PHXBN file you need to use Wolfire's custom export addon for Blender. A repackaged version of Blender for Windows with the export addons and with the UI set up for this task can be downloaded here. You may need to restart the program once to get the export options to show up.
TODO: How do you set this up yourself, if you're not using Windows for instance?
This article won't teach you how to use Blender, it only gives the information essential to get a character into the game. If you need to learn the basics of Blender, CG Cookie has a good free video tutorial series that introduces you to the software.
Here are the steps you need to take in Blender to create the .phxbn, .fzx and .obj files:
- Open Data\BlendFiles\rabbit_rig.blend in Blender 2.55 with the PHXBN-add-on installed
- Note: If you download Blender from the link provided at the top of this page, the right file is already loaded.
- Replace the rabbit model in the scene with your own character
- Press File > Import > Wavefront (.obj) to import an obj file.
- Bind your own mesh to the rig
- Select the mesh, then shift-select the rig to add it to your selection before you press Ctrl + P and select Armature Deform → With Empty Groups/With Envelope Weights/With Automatic Weights depending on how you want
- It's recommended to test your character in engine with automatic weights to check that you have no other errors before you start working on a final weight paint. It won’t look pretty, but will let you know early on how the character is going to work in the engine
- Unassign all vertices in your model from any bone in the rig that doesn't have DEF in the name
- Go into editor mode on the model and select all vertices
- In the Properties editor, go to the Object Data tab and expand the Vertex Groups menu
- Select a vertex group that doesn't have DEF in its name, click Remove, then select the next vertex group that doesn't have DEF in its name, click Remove again and so on until there are no groups assigned that doesn't have DEF in their name
- Edit the weight painting for your character if you need to
- Select the mesh, then shift-select the rig to add it to your selection before you press Ctrl + P and select Armature Deform → With Empty Groups/With Envelope Weights/With Automatic Weights depending on how you want
- Export your files
- With rig selected and in rest mode in object mode, export as .PHXBN
- With mesh selected in object mode and with the rig in rest mode, export as .OBJ, replace the .OBJ you imported if you want, since it's no longer needed
- TODO: how to create and export FZX? What is FZX actually used for? Is FZX required?
As long as everything went smoothly your character is now ready to be integrated into the game engine! The next step is to create the rigging data XML.
Rigging data XML
Links to the .OBJ and .PHXBN files that the engine needs to rig the character.
<?xml version="1.0" ?>
<rig bone_path = "Data/Custom/Markuss/ExampleMan/Models/ExampleMan.phxbn"
     model_path = "Data/Custom/Markuss/ExampleMan/Models/ExampleMan.obj"/>
Character XML
Links to the object XML and rigging data XML files as well as the animations and attacks the character will use.
<?xml version="1.0" ?>
<character>
    <appearance obj_path = "Data/Custom/Markuss/ExampleMan/XMLFiles/ExampleMan_Object.xml"
                skeleton = "Data/Custom/Markuss/ExampleMan/XMLFiles/ExampleMan_RigFiles.xml"/>
    <animations idle = "Data/Animations/r_idle2.xml"
                jump = "Data/Animations/r_jump.xml"
                roll = "Data/Animations/r_roll.xml"
                movement = "Data/Animations/r_movement.xml"
                wall = "Data/Animations/r_wall.xml"
                ledge = "Data/Animations/r_ledge.anm"
                medrightblock = "Data/Animations/r_activeblockmedright.anm"
                medleftblock = "Data/Animations/r_activeblockmedleft.anm"
                highrightblock = "Data/Animations/r_activeblockhighright.anm"
                highleftblock = "Data/Animations/r_activeblockhighleft.anm"
                lowrightblock = "Data/Animations/r_activeblocklowright.anm"
                lowleftblock = "Data/Animations/r_activeblocklowleft.anm"
                blockflinch = "Data/Animations/r_activeblockflinch.anm"/>
    <attacks moving_close = "Data/Attacks/haymaker.xml"
             stationary_close = "Data/Attacks/thrustpunch.xml"
             moving = "Data/Attacks/spinkick.xml"
             stationary = "Data/Attacks/frontkick.xml"
             moving_low = "Data/Attacks/soccerkick.xml"
             low = "Data/Attacks/sweep.xml"
             air = "Data/Attacks/legcannon.xml" />
 </character>
TODO: How do you decide what animations to use? TODO: How do you decide what attacks to use?
Script XML
Links to the character XML file and an AI script, this is the file you choose when loading a character.
<?xml version="1.0" ?>
<Actor>
    <Character>Data/Custom/Markuss/ExampleMan/XMLFiles/ExampleMan_AnimList.xml</Character>
    <ControlScript>enemycontrol.as</ControlScript>
</Actor>
Now you have everything you need to load the character into the game, so try loading this script XML file in the editor and see if it works!
At this point the character loads, but we are not finished yet! For the character to be able to be hit by thrown weapons you need to create a _hulls.obj model. This is covered in the next section.
Hulls
To enable your character to be hit by thrown objects you need to create a _hulls.obj file for it. The _hulls.obj file is a simplified collision representationis used for checking when thrown weapons hit the character.
You might want to use one of the existing _hulls.obj files as a base for creating your own. These can be found in the same folder as the model they are for, so for instance, in "Overgrowth/Data/Models/Characters/IGF_Turner" there is a IGF_Turner_hulls.obj file that you can use.
Here are the steps for creating your _hulls.obj file:
- Import or create a single mesh object in Blender with several individual convex hulls in it, you might want to keep your model in the same scene to see how everything overlaps
- TODO: Do the convex hulls need to be weight painted to the bones?
- Export the object as an .obj file into the same folder as the character's obj file, with the following naming convention: model_hulls.obj
So if the name of the character's model is "rabbit.obj", then the hulls.obj file needs to be named "rabbit_hulls.obj" to work.
To test out if your hull works, load up your character in the game and try throwing some weapons into them.
If you want to add your character to the spawner menu to make it easier for others to access, read the next section.
Short version:
- You must add it in a mod.
- You can add as many characters to the spawner menu as you want in a single mod, you just need to follow the below instructions for each, and add multiple
<Item>tags to your mod.xml file.
In your mod.xml file, add this xml tag: TODO: Make these paths more specific to characters
<Item category="My Custom Mod Characters"
      title="Some Character To Spawn"
      path="Data/Objects/example_item_pack/mod_item_example.xml"
      thumbnail="Data/UI/example_item_pack/thumbs/mod_item_example.png" />
-
categoryis the top level category where the character will show up, in the Load menu. -
titleis the name of the character, as it will show up in the spawner menu. -
pathis the path to the character XML that will get spawned. See the How to create a character section for which XML file to target (either the character XML itself, or a version you saved off that has modified default parameters). TODO: Be careful to advise which character XML to add to the spawner - there are multiple character XML files! -
thumbnailis the image that will be used for a tooltip when you hover over your character in the spawner menu.
See GameInstallDir/Data/ExampleMods/mod_xml_specification.txt for full information.
TODOs
TODO: Make sure all these headings are covered in this or some other article that we link to
File path conventions
TODO: Description of where to add files in mods so they don't conflict. Ala Hotspot_Scripting#File_path_conventions
Animations
TODO: Links to or docs on animations and export, tagging, etc
Morph targets
TODO: Links to or docs on morph target animations for hands, face, etc
Eyes
TODO: Links to or docs on morph target animations for eyes (might roll this up into other sections/other pages?)
Attacks
TODO: Links to or docs on attacks system and export, tagging, etc - related partly to animations.
TODO: Possibly also scripting attacks and animations, and character-bound input, etc - though maybe that should be in a different section?


